In order to set up an employee in your database, you will need to navigate to the Settings menu, over to the Items column, and then down to the Employee page. There, you should be able to double click on an employee that you would like to edit, or, if you would like to add a new employee, click on the + Add New button in the upper left hand corner.
Note: This article is only going to go over the main employee page. The Calendar and Permissions/List Defaults tabs will be covered in different articles.
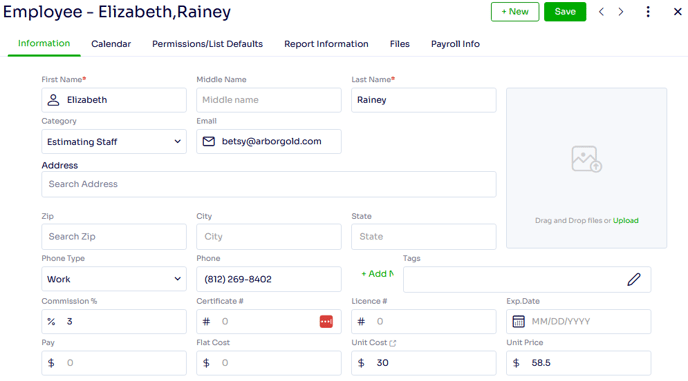
Once you reach the Employee pop up, you can begin filling out the main Information tab.
First Name / Middle Name / Last Name - This is the name of the employee as you would like to track them in your database. Note: only the first and last names are required fields, but you will want to make sure that the initials match what you have in Quickbooks for that employee when entering estimators.
Category - This setting allows you to break down your employee listing. To add additional employee categories to your database you will need to navigate to the Settings menu, over to the List column, open up the Categories drop down and then move down to the Employee page below. This is often used to group employees by office location, or by employee type, like crew laborer or salesperson.
Email - This is the employee's work email, and, while not a required field, is often entered for estimators for the sake of having this information print on the proposal.
Address / Zip / City / State - This is often utilized to display an employee's home address, or their base office location if your company has multiple branches or locations.
Employee Image - This is where you can enter in a picture of the employee to have on file.
Phone Type - This is where the type of phone number entered under Phone is represented.
Phone - This is the employee's phone number, and, while not a required field, is often entered for estimators for the sake of having this information print on the proposal. Note: if you would like to add additional numbers just click on the '+ Add New' button.
Tags -This is where you can add tags to describe additional, standard information about your employees that do not have a place on the page. For example, you can add a tag for role at the company.
Commission % - This is the commission rate that this employee makes off of their sales. The commission rate should be entered in as a decimal, so if the commission is 3% it would be entered as .03. Note: only one commission rate is available per employee; if you would like to calculate based off of multiple rates you will want to contact your account manager to see about having a custom report built.
Certificate # - This is generally where you would enter in the ISA certification for the employee, though it can be used for other certifications.
License # - This is generally where you would enter in the applicator license number for the employee, though it can be used for other licenses.
Exp. Date - This is where you would enter in the expiration date of the 'License #'.
Pay - The amount of pay your employee makes per hour.
Flat Cost - The flat cost to your company when the employee is applied as a service resource. When employees are added to services this will be auto defaulted in the 'Flat Cost' field. This is very rarely utilized, and is generally filled out when an employee is paid per service instead of per hour.
Unit Cost - The cost to your company for each hour of employee labor applied as a service resource. When employees are added to service this will be auto defaulted in the 'Unit Cost' field. Note: this can be pulled from your Overhead Set Up page (see here).
Unit Price - The price you will charge the customer for each hour of employee labor applied as a service resource. When employees are added to services this will be auto defaulted in the 'Unit Price' field. Note: this can be pulled from your Overhead Set Up page (see here).
Authored by Betsy Rainey 06/12/2023