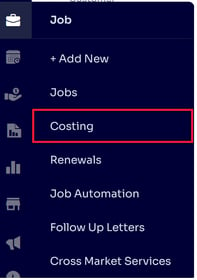
You will generally want to access the Job Costing in one of two locations. The first is through the Costing button in the menu over to the left of your screen. This will display, by default, any service that has been scheduled for the current day for any crew.
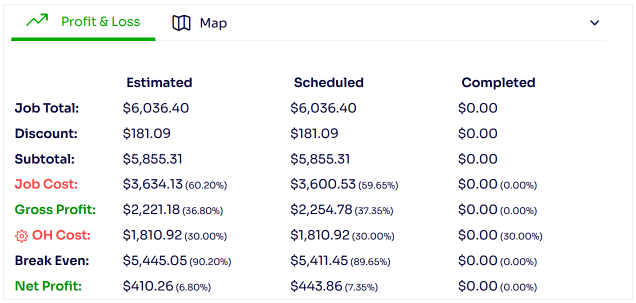
The second is from the Job Cost link on the 'Profit & Loss' chart on the Job Information page. This will display, by default, any service that has been scheduled on that specific job.
Regardless of what method you use to get there, the Job Costing page will display the following columns to you: Job Name, Number (#), Item, Service, Qty, Est. Hrs, Act. Hrs, Sch. Hrs, Price, Cost, OH Cost, BE, Profit, Crew, Type, Cmp. Date, and Status. You can edit the columns viewed by clicking on the three box icon in the upper right hand corner.

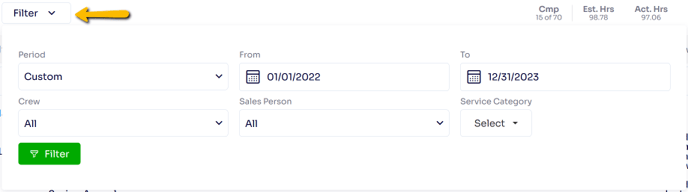
You can also filter this page to only display the information you want to see, including the date range, crew, salesperson, and service category.
Once you have filtered for what you want to see, and have edited your columns to your liking, you can see additional information for each service by clicking on either the downward facing carrot icon, or the '+' icon over to the right of each line item.
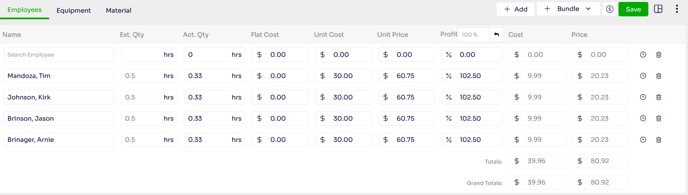
The downward facing carrot icon will display your service resources to you, including your Employees, Equipment, and Material items. Here we will see default columns for: the name of each resource, Est. Qty, Act. Qty, Est. Time (for Material items only), Flat Cost, Unit Cost, Unit Price, Profit, Cost and Price.
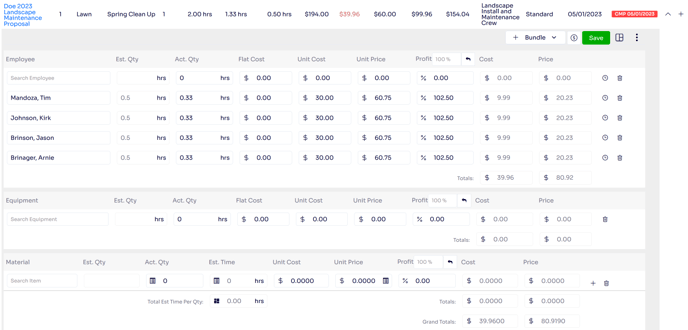
This is where resources can be edited most easily, as you are able to edit what resources were used, how much was used, and what the unit cost and price are for each item. As this information is edited, the service information columns update accordingly. Note: your service price will only update if you are utilizing one of the two Time and Material service pricing methods.
If you would like to update the actual clock in and clock out times for your resources, instead of just editing the Act. Qty, you can move down to the bottom of the service resources to where you can see the Time Info, Time Track, and Hours Analysis tabs.
![]()
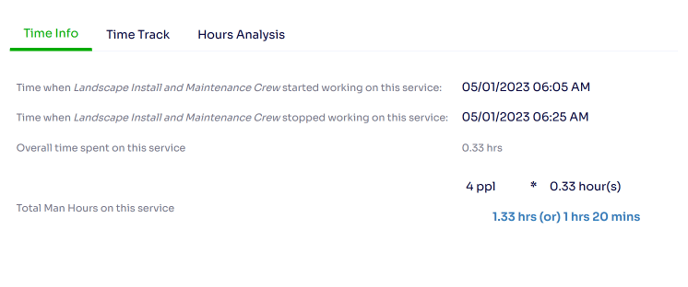
The Time Info tab displays a brief overview of the hours on the service, including the clock in and out times, the hours spent on the service, the number of crew members, and the man hours spent on the service.
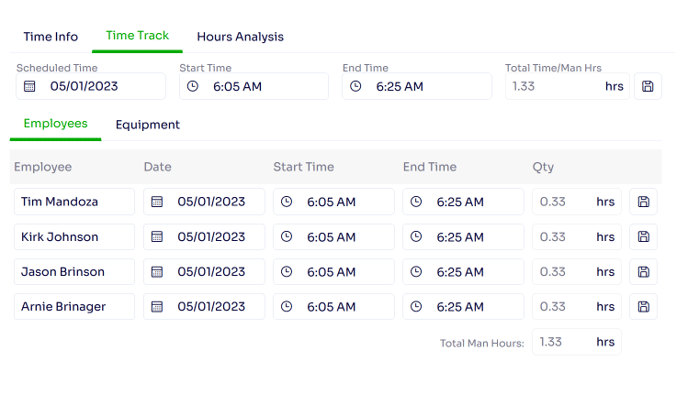
The Time Track tab displays the scheduled date, start time, end time, and hours for both the service, and the individual employees assigned to the service. This is where you can edit the start and end time for the service as a whole (in the section above the Employee and Equipment tab), or for each individual Employee and Equipment item (in the section below the Employee and Equipment tab). Note: if you edit the individual Employee and Equipment item, you will want to click on the individual save button to the right of that resource, and not the save button up at the top next to the service level information. Clicking this save button after making your edits will override your individual data.
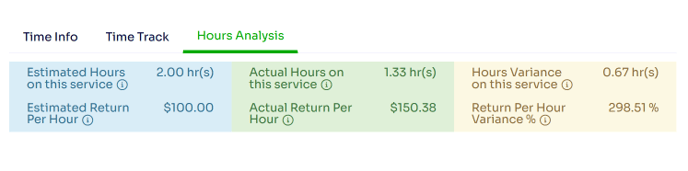
The Hours Analysis tab displays the estimated hours and RPH, the actual hours and RPH, and the variance for both the hours and RPH.
Other options that allow you to edit or view additional information on this page include the following.
![]()
Recalculate Scheduled Hours - will recalculate the service scheduled hours based on the service estimated man hours and the number of employees assigned to the service. If the work can be done faster with more employees then you will likely want this to be toggled on; for example if you originally scheduled three employees, but ended up adding an additional employee resource on the crew for the day.
+ Bundle - allows you to add a Material Package to the service instead of adding each material item individually. See the Create Material Packages documentation here.
Mark Completed - allows you to mark a service as completed in the Job Costing page, thus removing the need to return to the scheduler or the service details page.
$ - will update the service price based on the actual resource usage regardless of service status, and will update the hours if the service is in pending status.
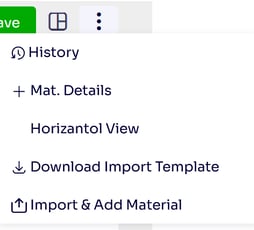
The three stacked dots in the upper right hand corner open up further options, such as History, + Mat. Details, and Horizontal View. While History (here) and + Mat. Details (here) will be covered in their own articles, the Horizontal View allows you to review your resources in horizontal tabs as opposed to being stacked on top of one another.
Now, once we access the '+' icon, we will be brought to a copy of the Service Details page that we generally access on the Job Information page, but with the notable additional of the Weather information. You can learn more about the Service Details pop up here.
Edited By Betsy Rainey 06/05/2023