Time Tracking Enhancements 7.7 Update - Time Track Enhancements Caleb
Overview
This Time Track release includes the following major enhancements:
Extending our Time Tracking to Jobs via Cloud and Mobile Crew
New Time Track GPS Visualizations, which compare employee clock in and clock out locations against job geolocation, and show employees’ travel routes
Capturing metadata for the Time Tracks created/updated by and on, created/last updated by and on, and created/last updated location.
Ability to Deactivate, Delete, and Restore Time Tracks
Permissions for Time Tracks and the Timesheet
Determining Payroll Items to be associated with Time Tracks
Exporting Time Tracks to QuickBooks for Payroll generation
New Time Track Logging which captures all Time Track events such as creation, updation, deactivation, deletion etc.
Contents
Tracking Time
-Extended Time Tracking to Jobs
---via Cloud
-Clocking Into a New Time Track will automatically Clock Out the Previous Time Track
-Improvements to Time Tab on Mobile Crew
-Additional properties available in Timesheet
-New Deactivate, Delete, and Restore options for Time Tracks
-Time Track Employee Permissions and and List Dropdown Defaults
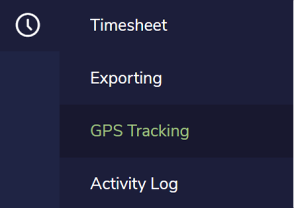
GPS Tracking
Payroll
---Payroll Items in Arborgold (Listing, Adding, Updating, Deactivating and Restoring)
-Update Time Tracks from the Export Listing
Activity Logging
Tracking Time
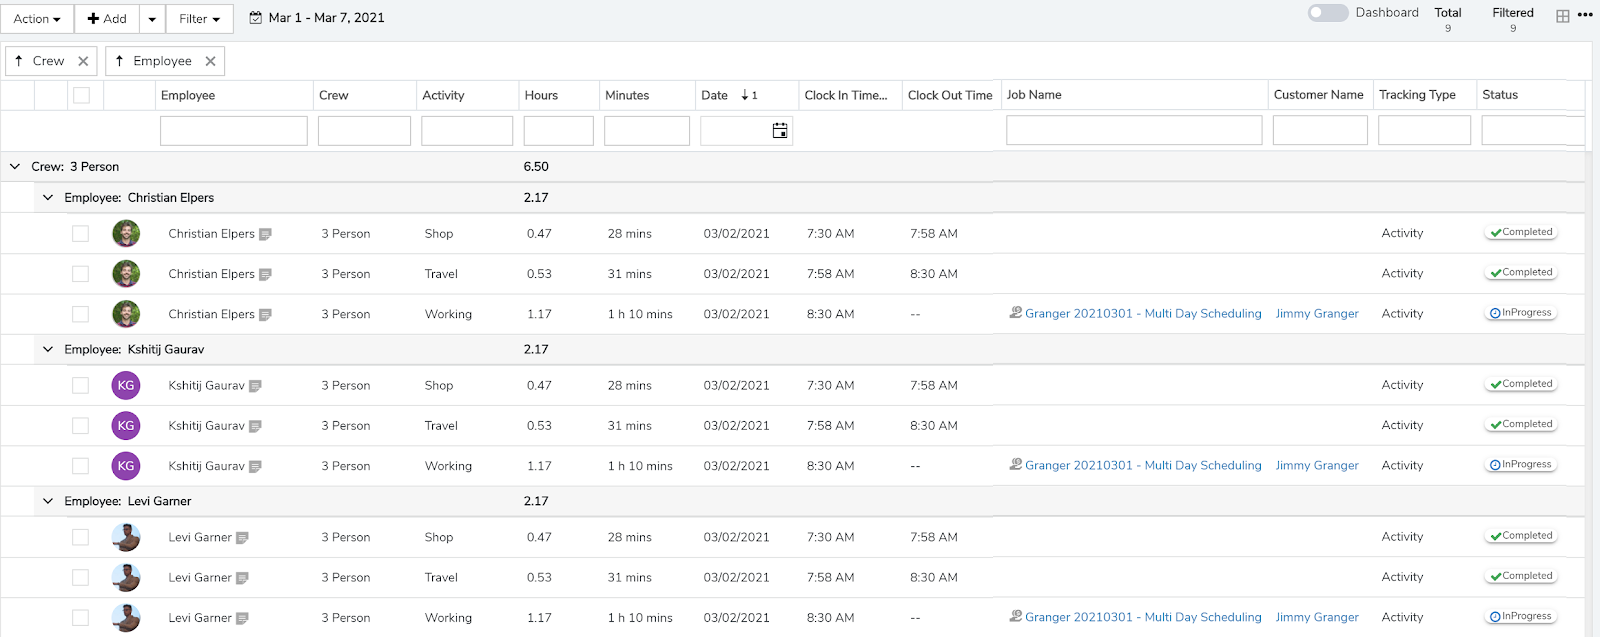
Extended Time Tracking to Jobs
via Mobile Crew
On the Mobile Crew, when the crew clocks into a job from the Jobs tab, it will create a “Job Time Track” for each distinct employee selected on the Confirm Service/Resource popup.
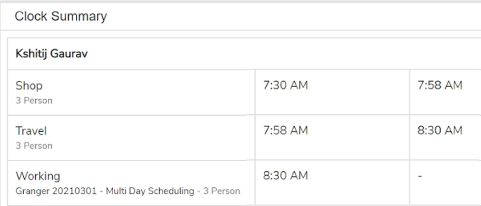
The employee being clocked into the job will be clocked out of any indirect Time activity such as “Travel” when the Job time track record is created.
In this example, you can see that the employees are clocked in for the indirect activity “Travel”, and there is no Job associated with the time track record.
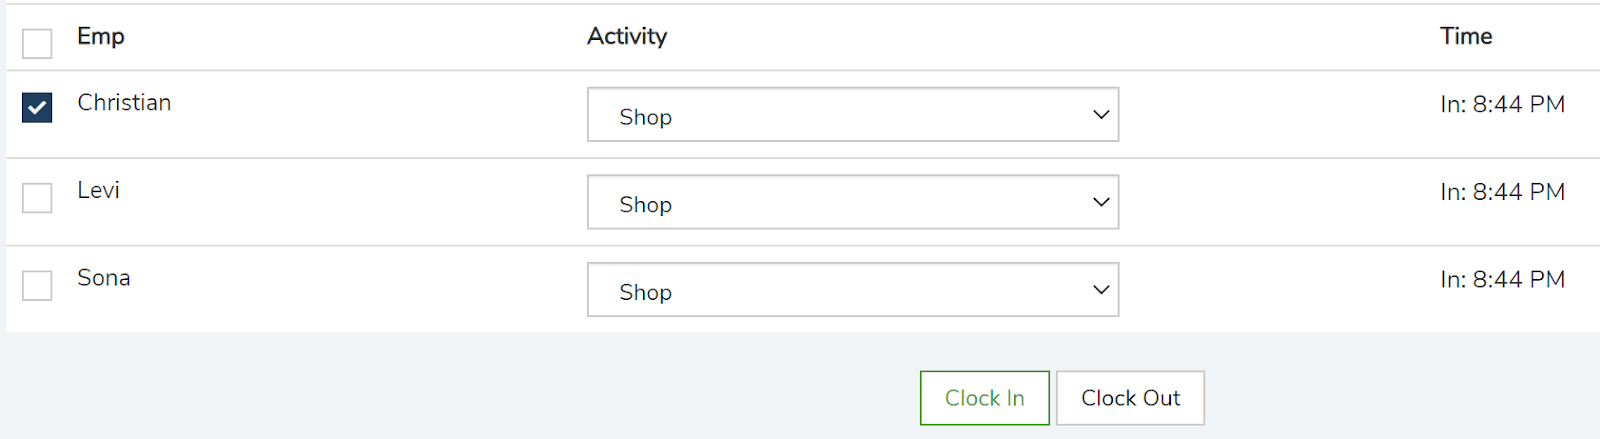
When the crew employees clock in to begin working on the job, the crew will be prompted to Confirm the Service/Resources. The Confirm Service/Resources shows all Employee, Equipment, and Inventory resources assigned to each service.
The crew can remove resources not required. If a resource is not selected on Clock In, it will be removed from the service.
The crew must also select an Activity to clock into the Job (here, Working).
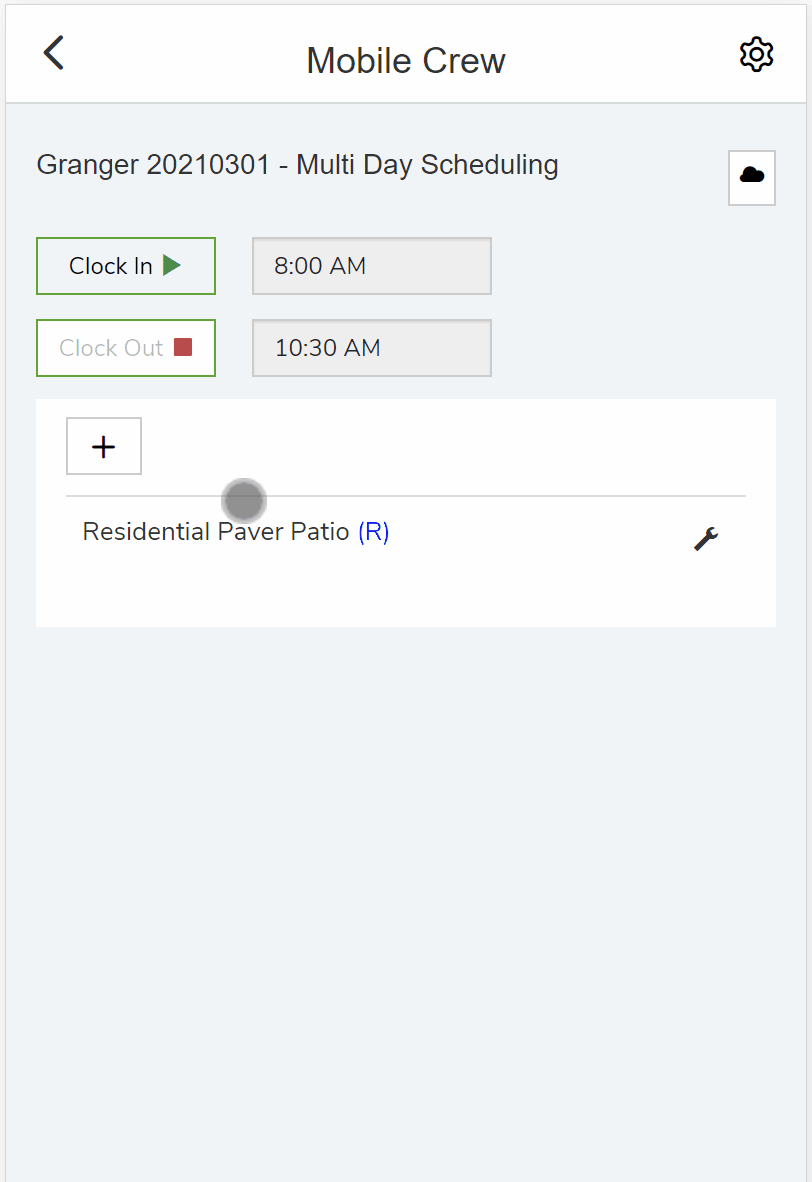
When they click Clock In, they will automatically be clocked out of the previous time track activity, and a new Job time track will be added for each employee.
The activity log will show that the new time track record was added, and the old record was updated with a clock out time.

We’ve streamlined the experience for your crews to switch between activities when they clock out of a job. This will result in more accurate indirect activity time tracking. For example, when your crew clocks out of the job, they are prompted to clock into the next indirect time activity, such as “Travel” or “Lunch”, within the Confirm Job Clock Out popup.
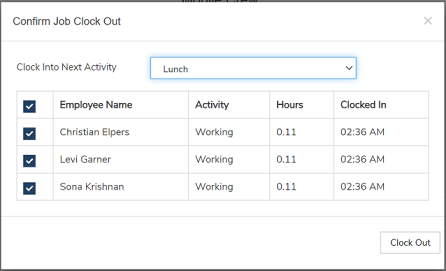
Before, the Crew would have been required to navigate to the Time tab to clock the employees out of the current activity such as “Working,” and into the next activity “Lunch.” This is all done for your crews behind the scenes! This will also result in more accurate data enabling your organization to see how much your crews are spending working vs traveling with almost no effort from your crews.
via Cloud
On the Cloud, we have added the ability to associate a Job with any time track from the Timesheet. When Adding or Updating a track, you can search for and select a Job to associate with it. You can update and assign a Job to a single time track, or in batch.
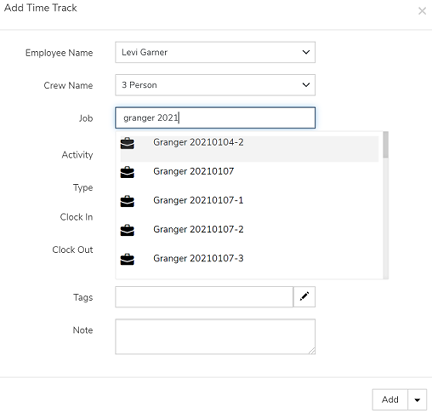
On the Timesheet, the new Job Time Tracks will show up with the Job Name and Customer Name. Click those links to go to the respective Job or Customer screen. You can also click the Job Costing icon next to the Job Name to navigate to that job’s Job Costing page.
Clocking Into a New Time Track will automatically Clock Out the Previous Time Track
If employees are currently clocked in to any activity, and they clock in to a different activity, they will automatically be clocked out of the first activity. They do not need to clock out first before switching activities.
Example:

The employee is currently clocked into Travel.
If he then clocks into Shop, he will automatically be clocked out of Travel.

This applies to the Time and Jobs tabs on MC, and the Timesheet on Cloud.
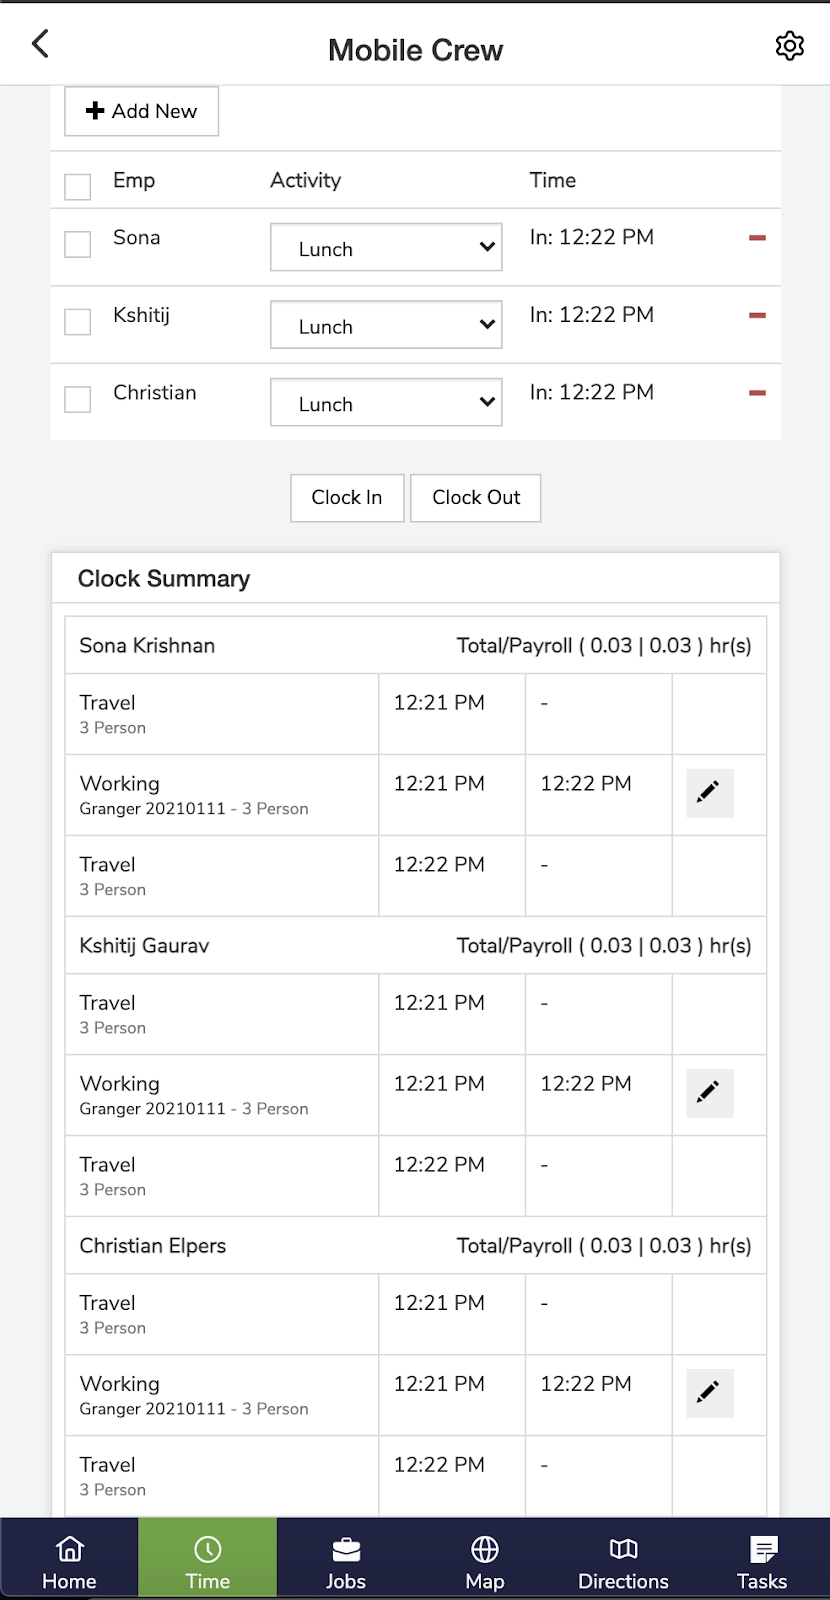
Improvements to Time Tab on Mobile Crew
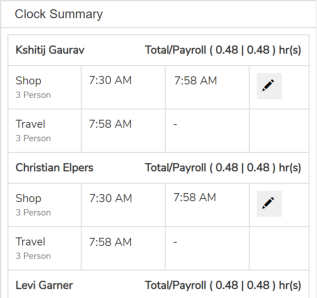
The Time Tab on the Mobile Crew now shows Total Hours vs Payroll Hours per employee.
The Clock Summary additionally shows the Jobs clocked under the activity along with the Crew Name in cases where the employee worked on more than one crew that day.
Additional properties available in Timesheet
Each of the following checked columns is a newly added property to the timesheet.
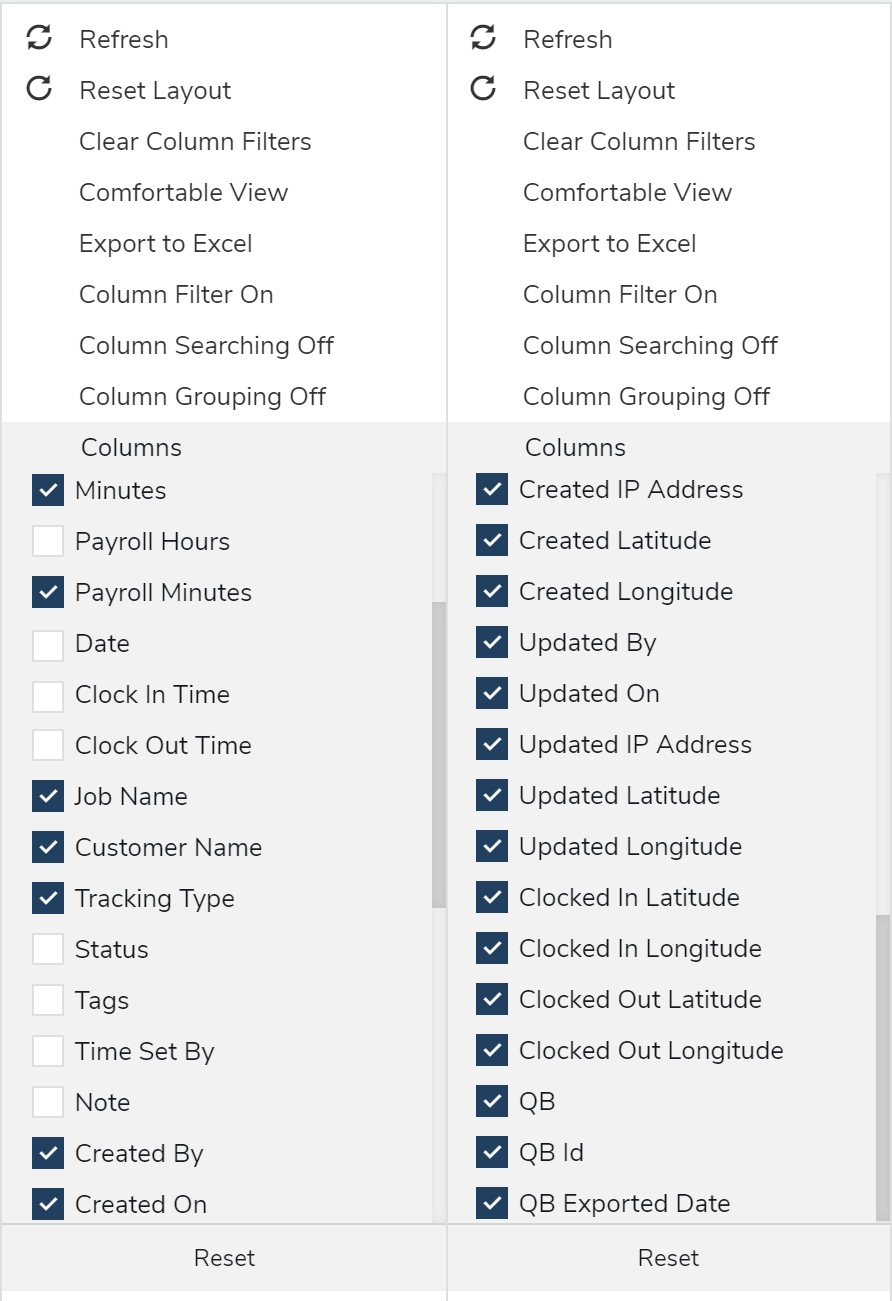
Minutes/Payroll Minutes: You can now view the time track durations in minutes as well as hours.
Job/Customer Name: For any time track whose type is Job, you can view the Job and Customer name associated with that job. Click the hyperlinks to go to that job/customer information page.

Clicking the Job Costing icon will take you to the Job Costing screen for that job.


Tracking Type: You can see if the time track was entered as an Activity or a Job track.
Created: These properties show identity/date/location information for when the time track was created.
Updated: These properties show identity/date/location information for when the time track was last updated.
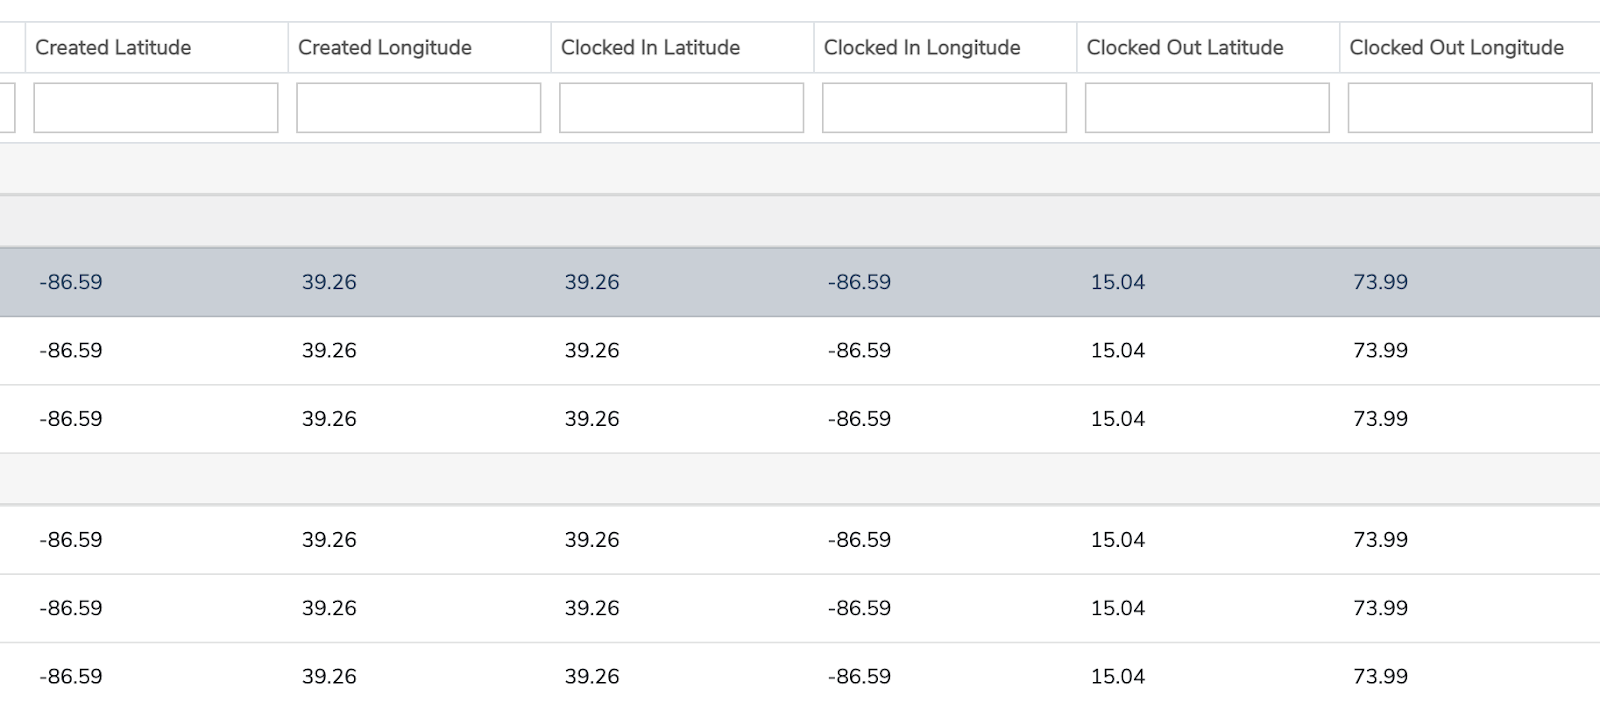
Clocked In/Out: You can view the geographical coordinates of where employees clocked in and out of each record.
The Clocked in Lat and Long will only be set if there is a physical clock in for a Time Track. The Created Lat and Long will be set on both Clock In and a manual Add. We will be using these Latitudes and Longitudes for our new Crew and Employee Tracking features.
QB: You can view if the time track has been exported to QB (if so, there will be a checkmark in this column), the QuickBooks ID, and the date that the track was exported. These will be updated when you use the Export To QB action.
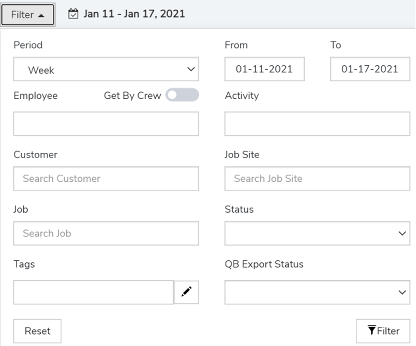
Expanded Timesheet Filters
The Timesheet filter now includes Customer, Job, Job Site and QB Export Status.
You can now filter to see all time activity done on a specific Job, at a specific Job Site, or for a specific Customer. Only Job Time Tracks will have this associated information.
You can use QB Export Status to easily see what records have and have not been exported to QuickBooks.
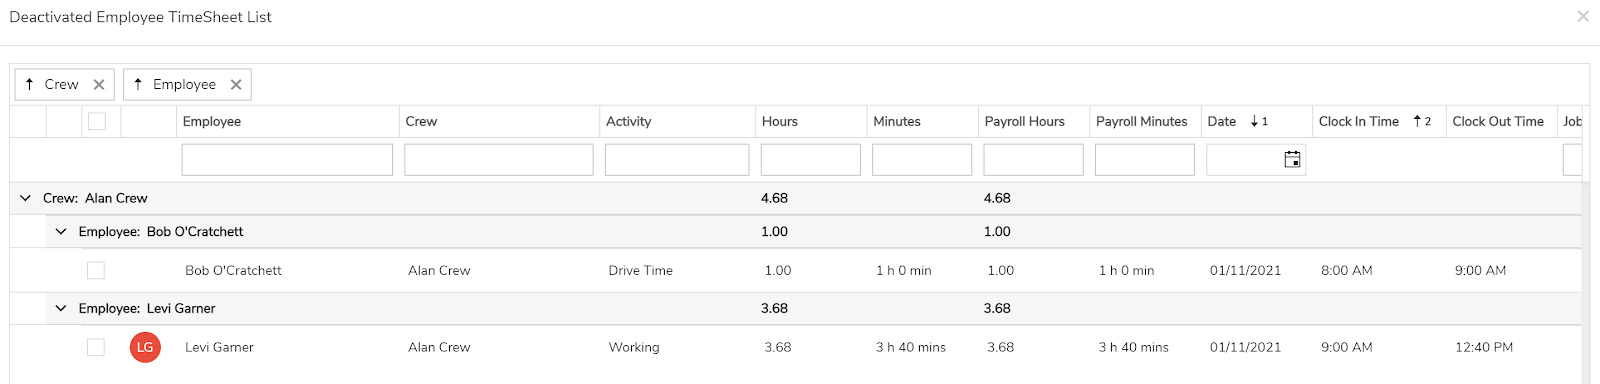
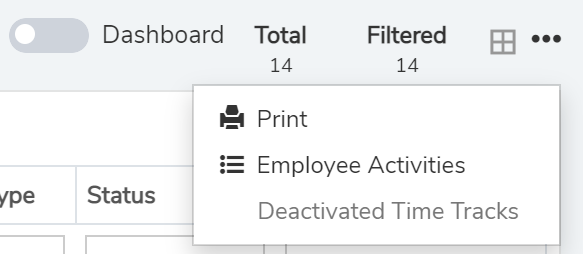
New Deactivate, Delete, and Restore options for Time Tracks
In the Action menu, Delete has been renamed to Deactivate. Deactivated entries will be removed from the main timesheet listing and appear in the Deactivated Time Tracks listing.
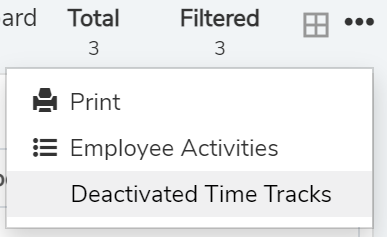
You can restore the time tracks or physically delete them under the more action ellipse on the main Timesheet listing (top-right). Select Deactivated Time Tracks, then select the desired log(s) from the list and click Restore. You can also choose to permanently Delete them.
Note that you will not be able to restore deleted time tracks (although their information will still be visible in the Activity Log).

Time Track Employee Permissions and and List Dropdown Defaults
At the point of release all employees will have the permissions and all employees will be included in the Time Track select list. Include In Time Track List controls whether that employee is selectable from the Employees list when adding a Time Track.
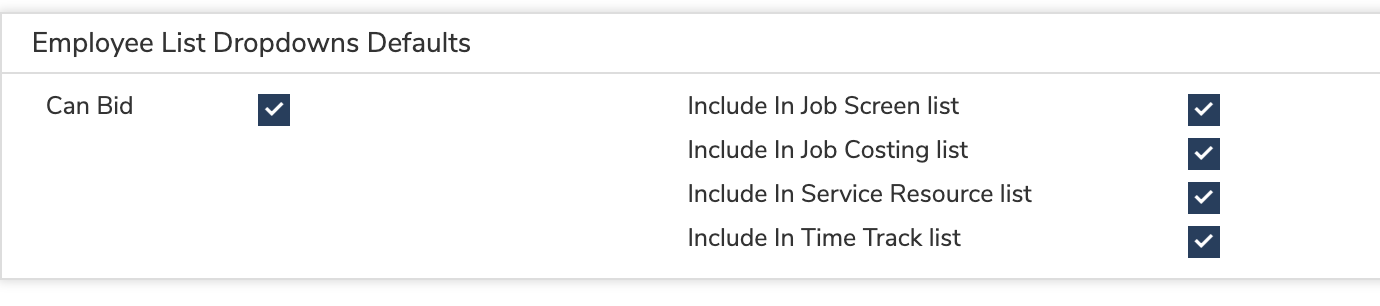
If it is disabled, that employee will not appear in the list or be searchable, even if they are associated with a selected Crew.
The Time Track permissions control what actions the user is able to take on the Timesheet.
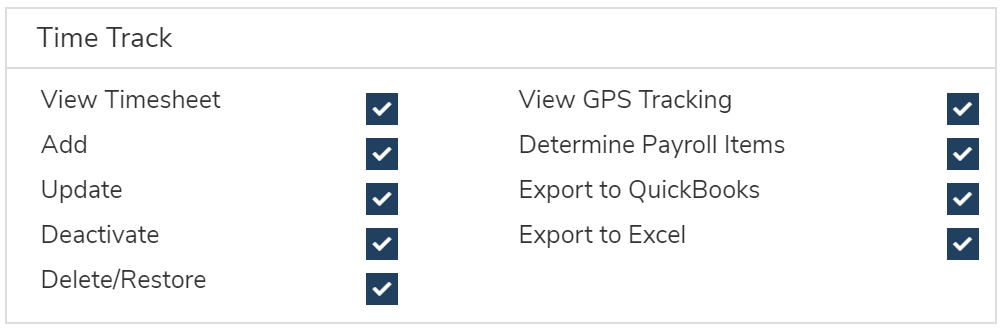
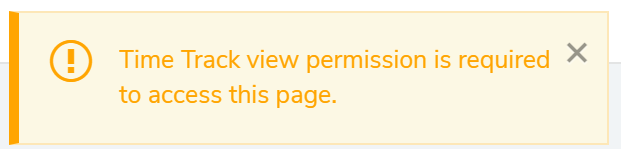
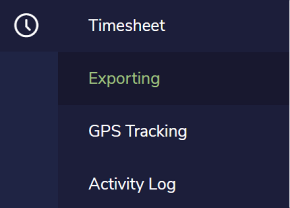
View Timesheet: controls access to the Timesheet, Exporting, and Activity Log. If this is disabled, the employee will not be able to view any Time-related pages.
View GPS Tracking: controls access to the Time -> GPS Tracking page.
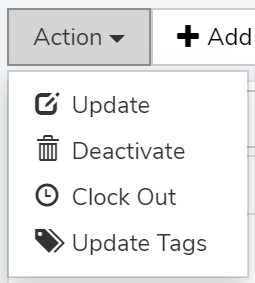
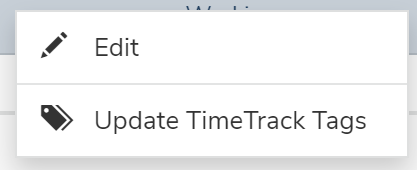
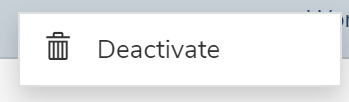
Add, Update, Deactivate: control what actions the employee can take on the Timesheet and Exporting pages. If one or more of these is enabled, View will automatically be enabled. “Update” controls Update, Clock Out, and Update Tags actions, as well as “Mark Exported”.
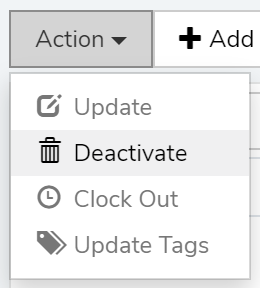
Update and Deactivate permissions will also control what appears when you right-click on a time track. Example: the first image shows Update only, the second shows Deactivate only.
Delete/Restore: controls access to Deactivated Time Tracks. With this disabled, the employee cannot open the list to view, restore, or delete the deactivated time tracks.
Determine Payroll Items: controls whether the user can Determine Payroll Items from the Exporting page. If this permission is disabled, that button will be disabled.
Export to QuickBooks: controls whether the user can Export To QB from the Exporting page. If this permission is disabled, that menu item will be disabled.
Export to Excel: controls whether the user can Export To Excel from the Timesheet or Activity Log column views.
GPS Tracking
Time Track GPS Tracking
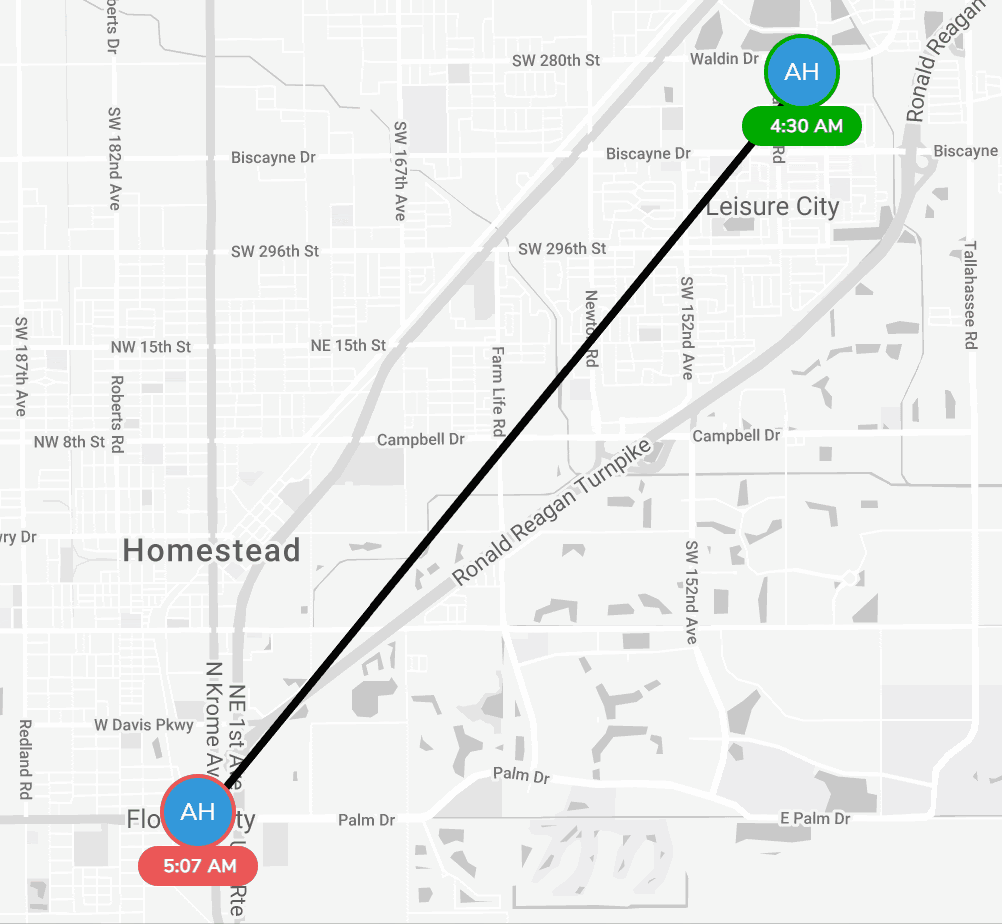
We capture geolocation data for each Clock In and Clock Out. These can be plotted in the GPS Tracking tab to track where employees started and traveled throughout the day. You can access this page via Time -> GPS Tracking.
You can filter tracks using the same Filter that is on the Timesheet, or in the columns. Select a Time Track to see it plotted on the map. Green is Clock In, Red is Clock Out. You can select multiple time tracks to show a full route. Clicking one of the map markers will show the Time Track details on the map.
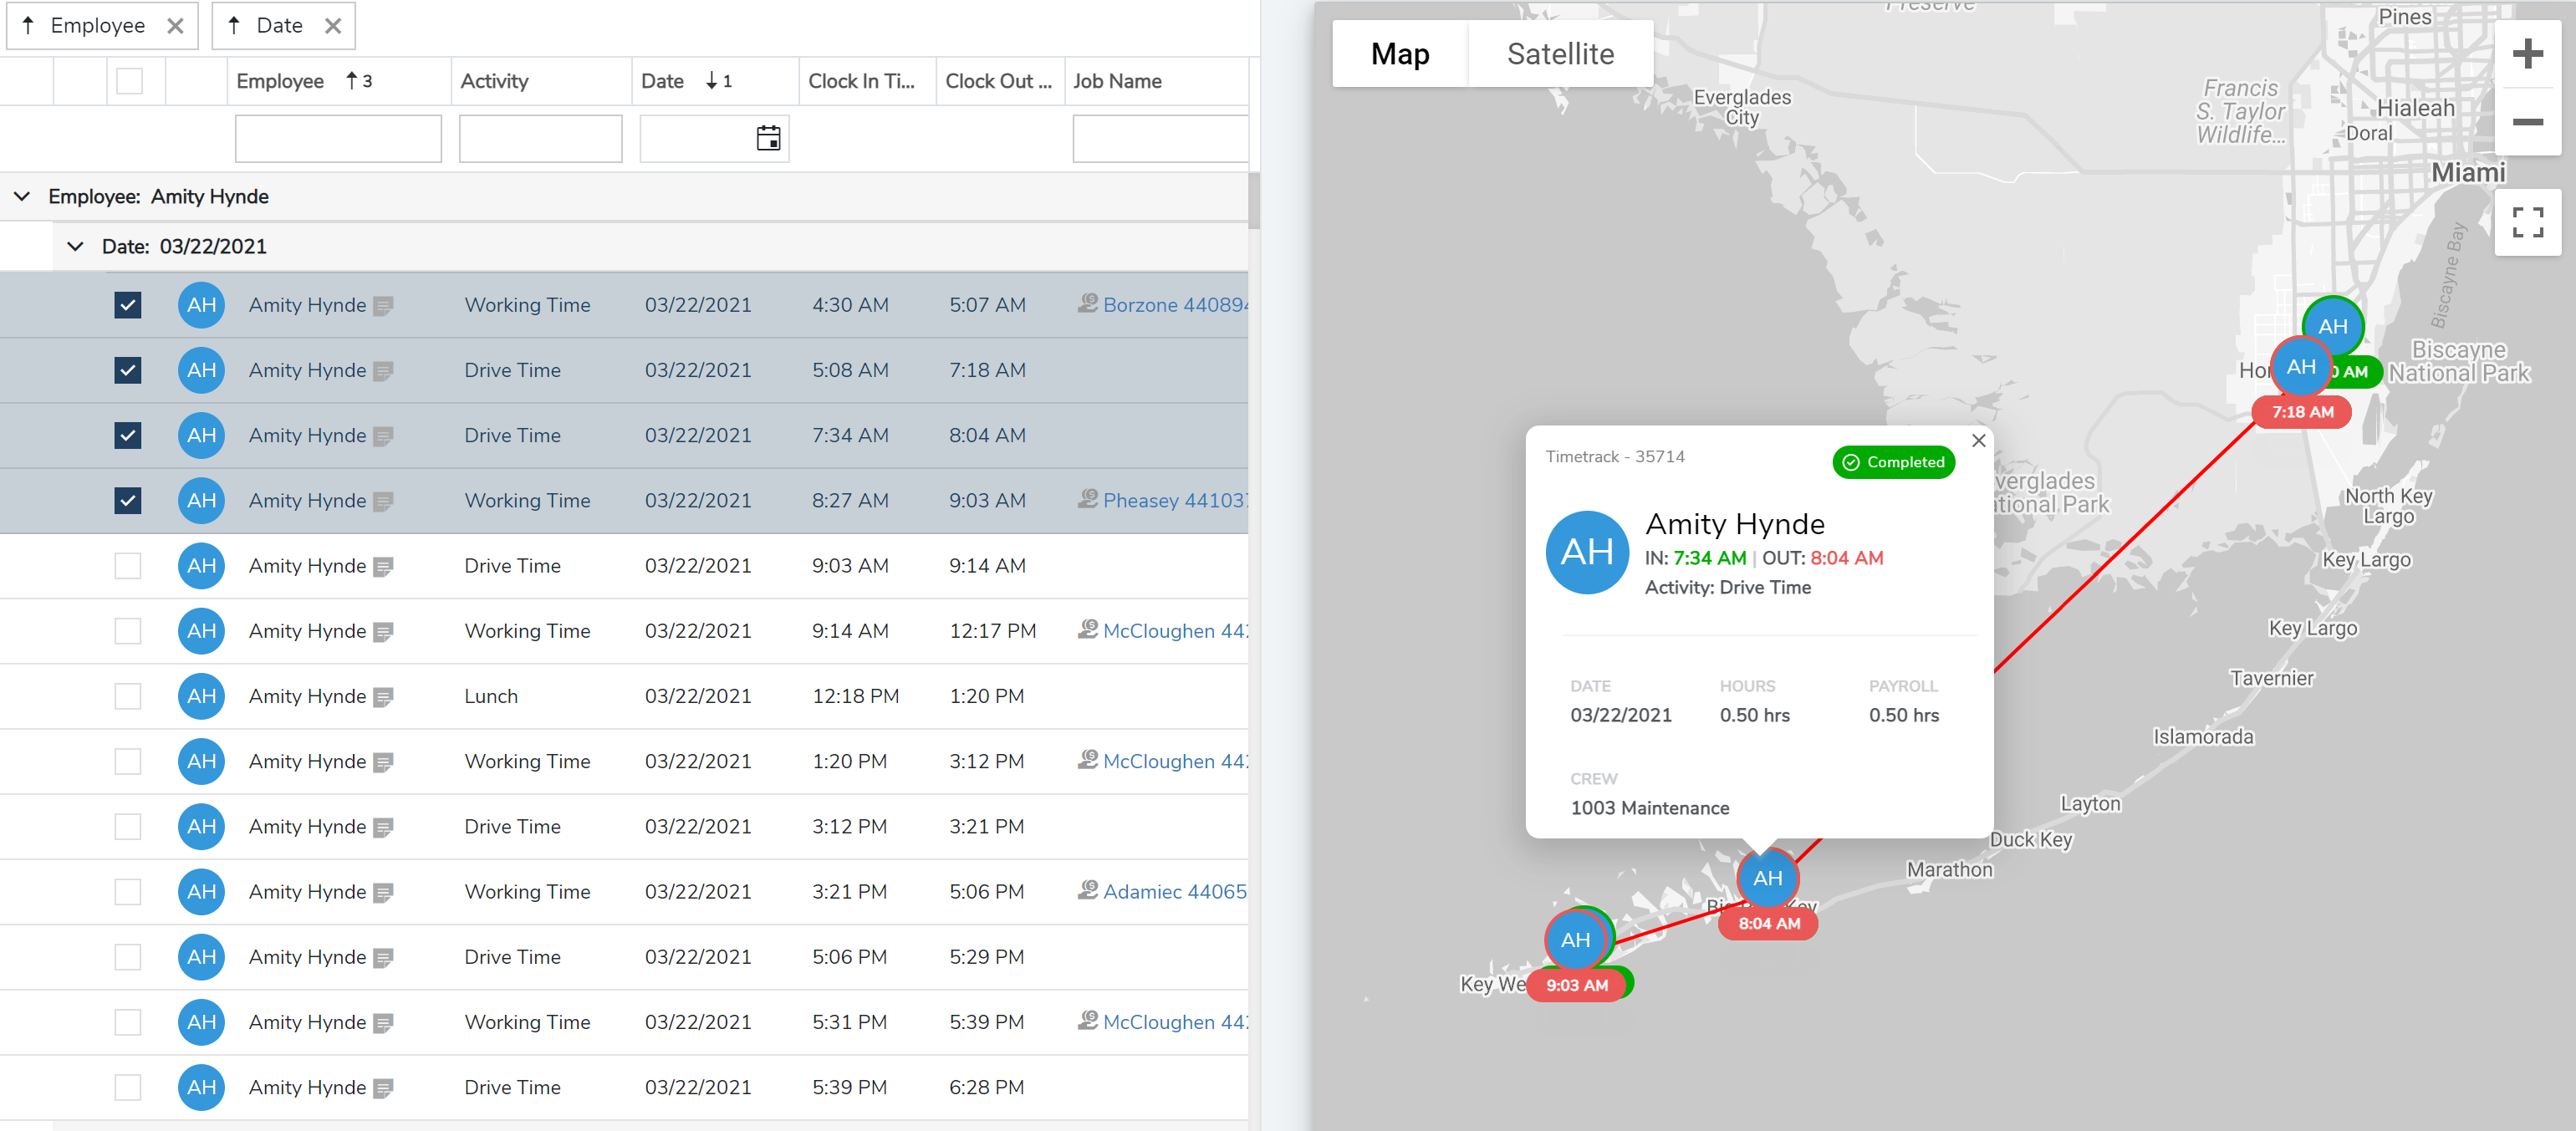
Note: GPS map plotting is only available for time tracks for a single employee on a single day. Multiple employees and/or multiple days cannot be plotted at once.
Once selected, you can click on a time track again to see the route/direction the employee took.
Payroll
Payroll Items
Importing Payroll Items
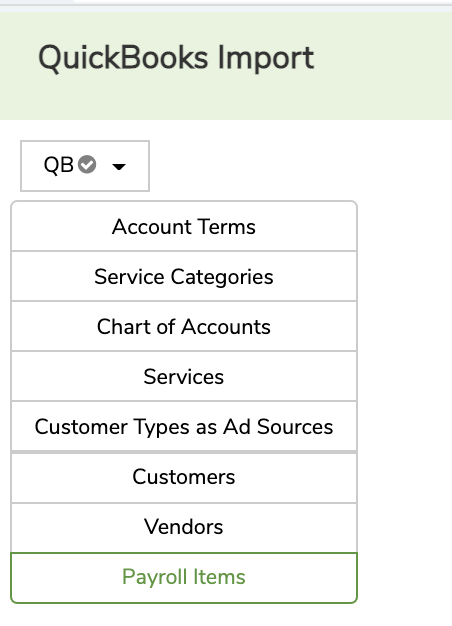
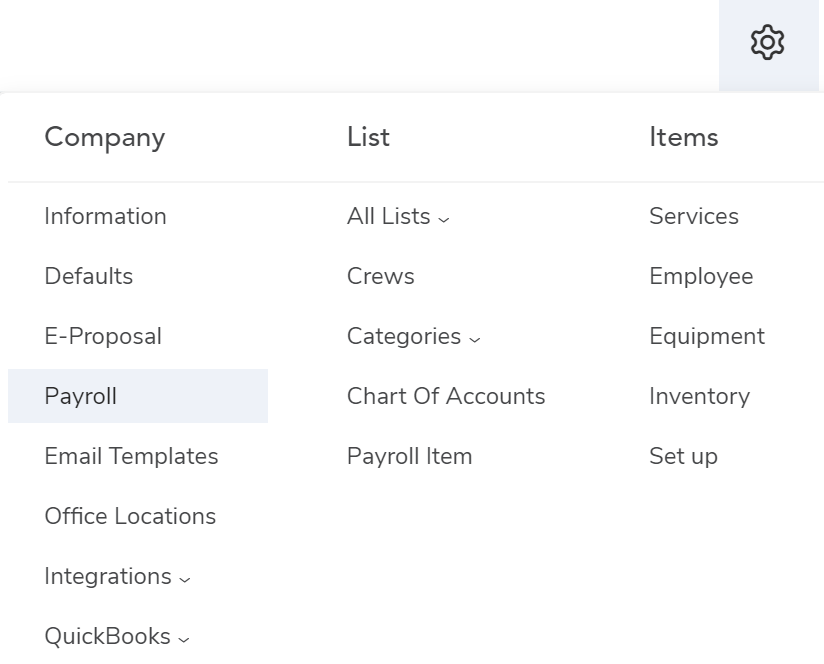
To export Time Tracks to QuickBooks you’ll first need to import your organization's Payroll Items from QuickBooks. You can import your Payroll Items via the Payroll Item Listing (Settings -> List -> Payroll Item) or the QuickBooks Import screen (Settings -> QuickBooks -> Imports).
Note: If you don’t integrate with QuickBooks but still want Arborgold to Determine Payroll Items for your Time Tracks and export to another Payroll Generation software, then you can manually create the Payroll Items, shown in the next section.
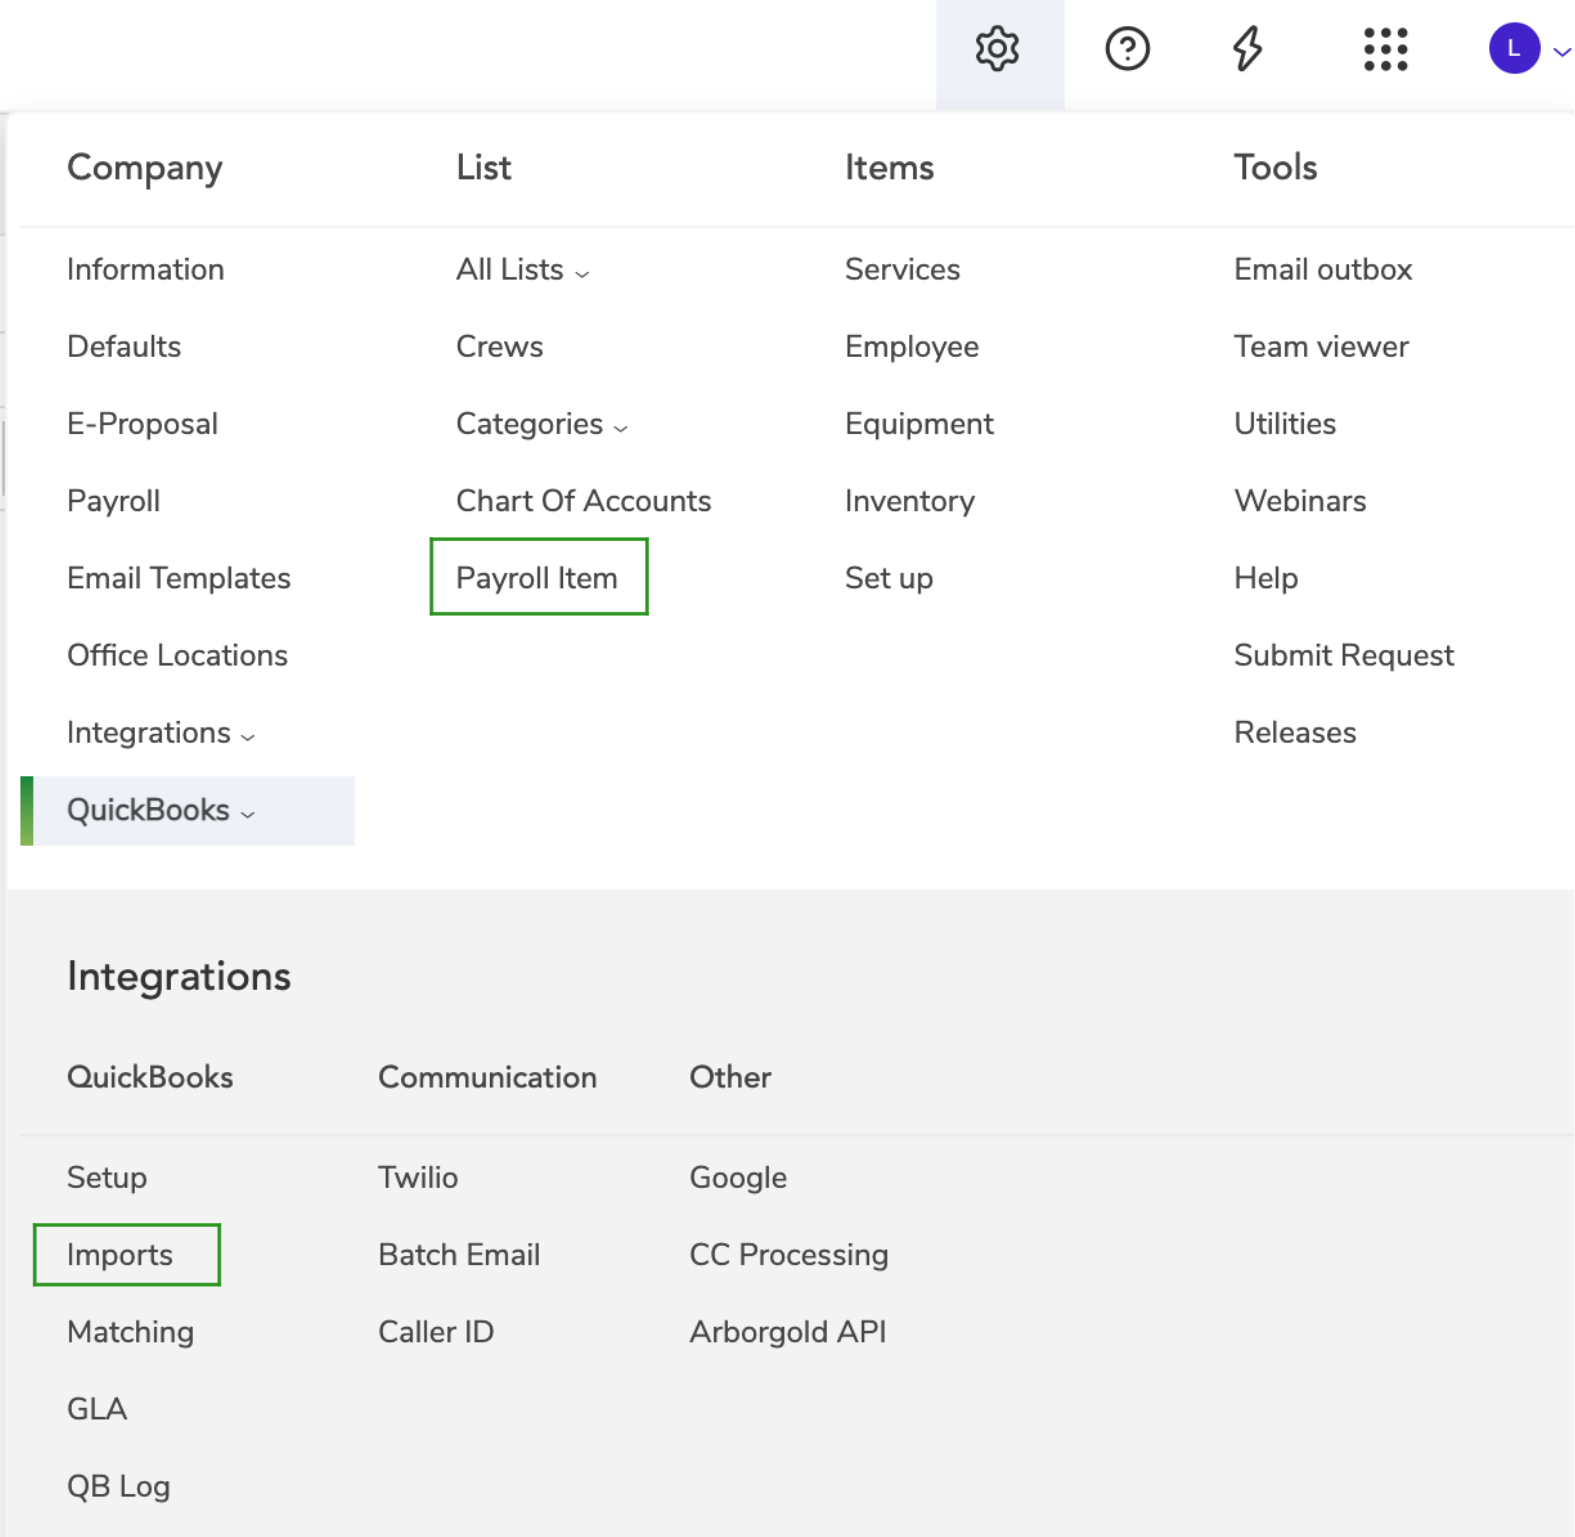
Importing from QuickBooks Imports:
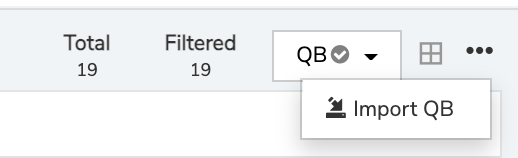
Importing from Payroll Item:

Once imported, Payroll Items can be accessed from the Settings menu under List -> Payroll Item.
Payroll Items in Arborgold (Listing, Adding, Updating, Deactivating and Restoring)
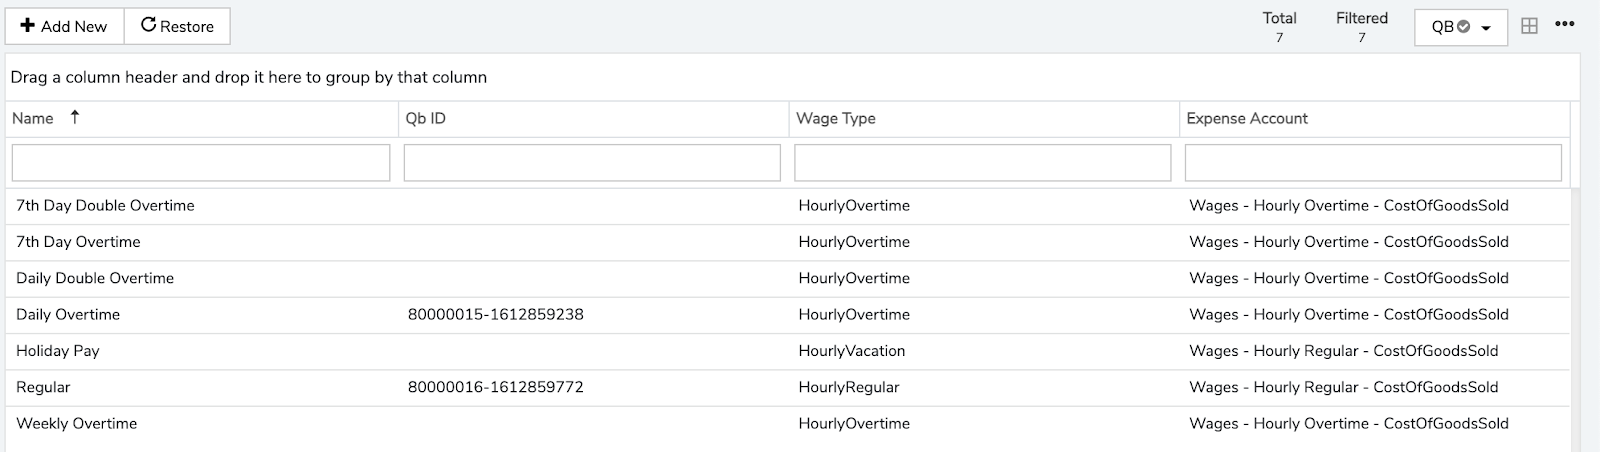
From the Payroll Item listing, you can Add, Update, Deactivate, and Restore Payroll Items.
To create a new Payroll Item from Arborgold, without importing one from QuickBooks, you can select Add New. Give the Payroll Item a Name, Wage Type, and Expense Account.
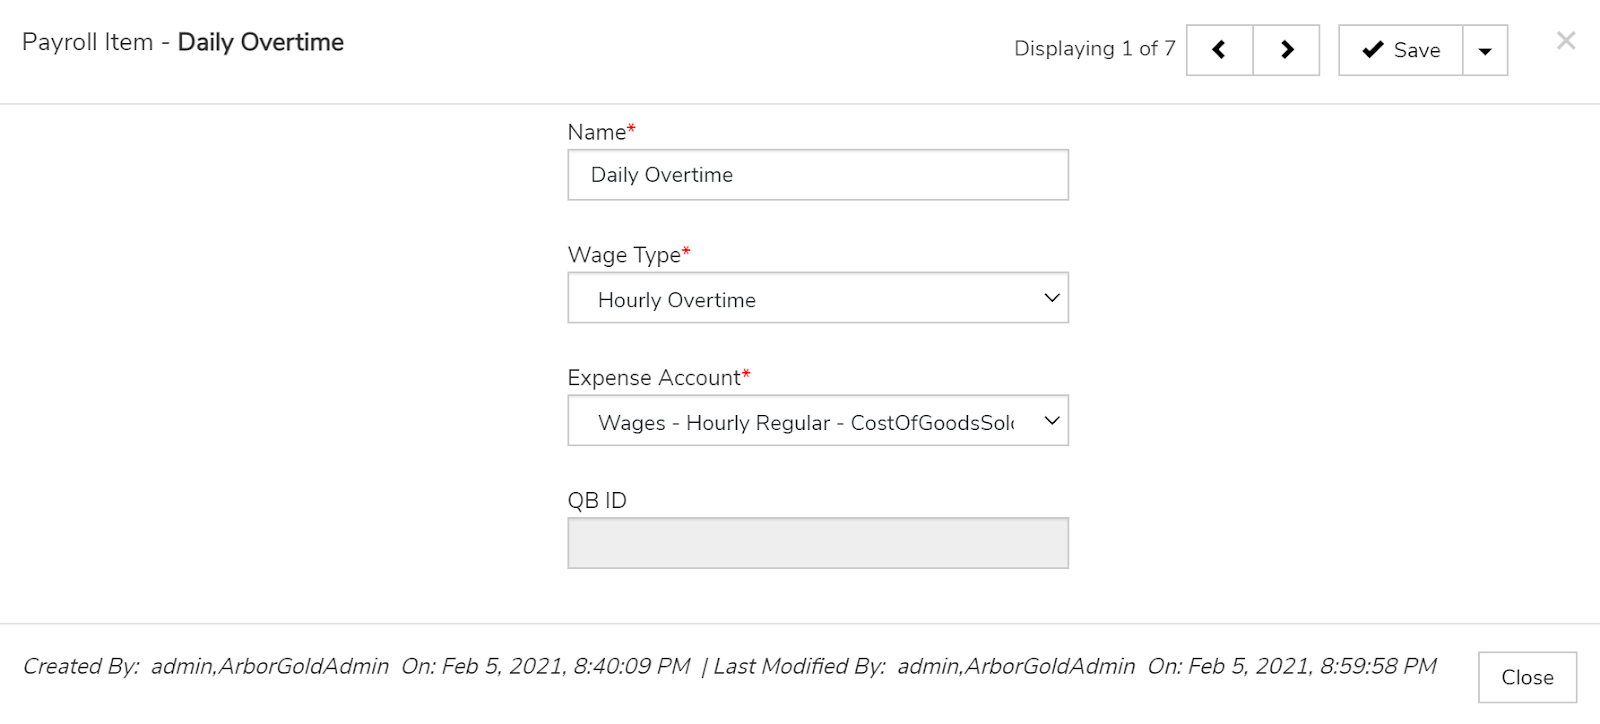
Right-click or double-click on an entry to Edit or Deactivate that item. Items can also be Deactivated from the Edit menu.
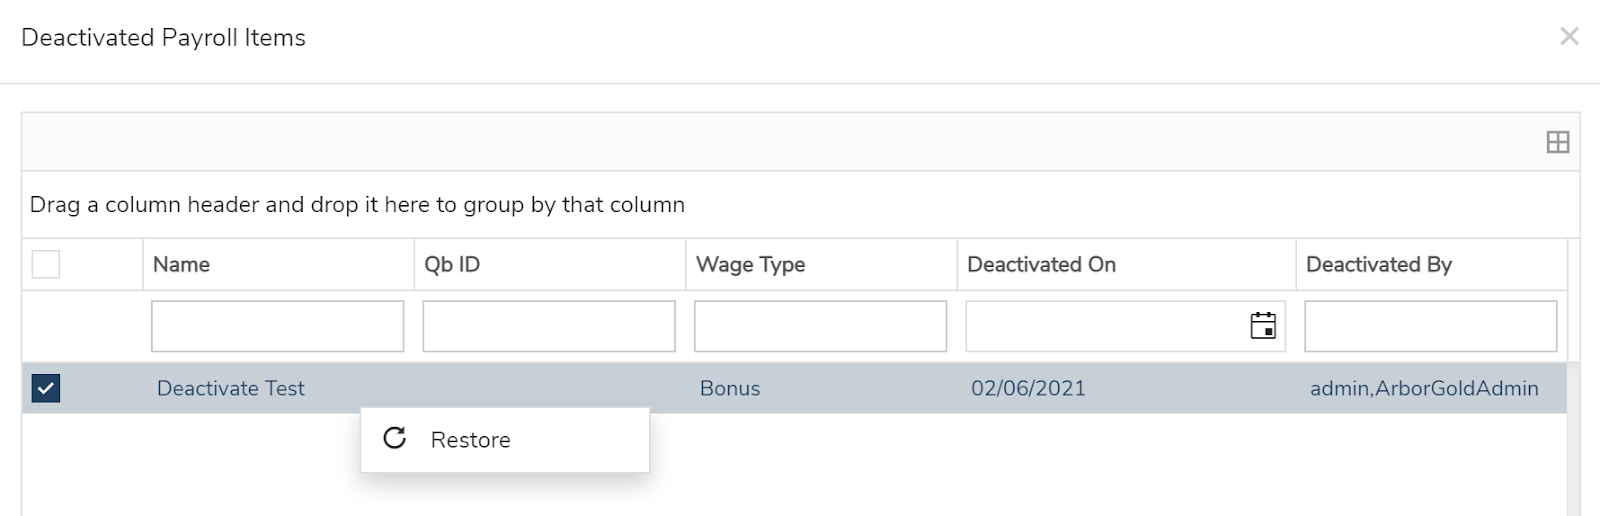
To restore deactivated items, click Restore at the top-left to bring up the Deactivated Payroll Items listing. Here you can select one or more previously deactivated items to restore.
Payroll Settings
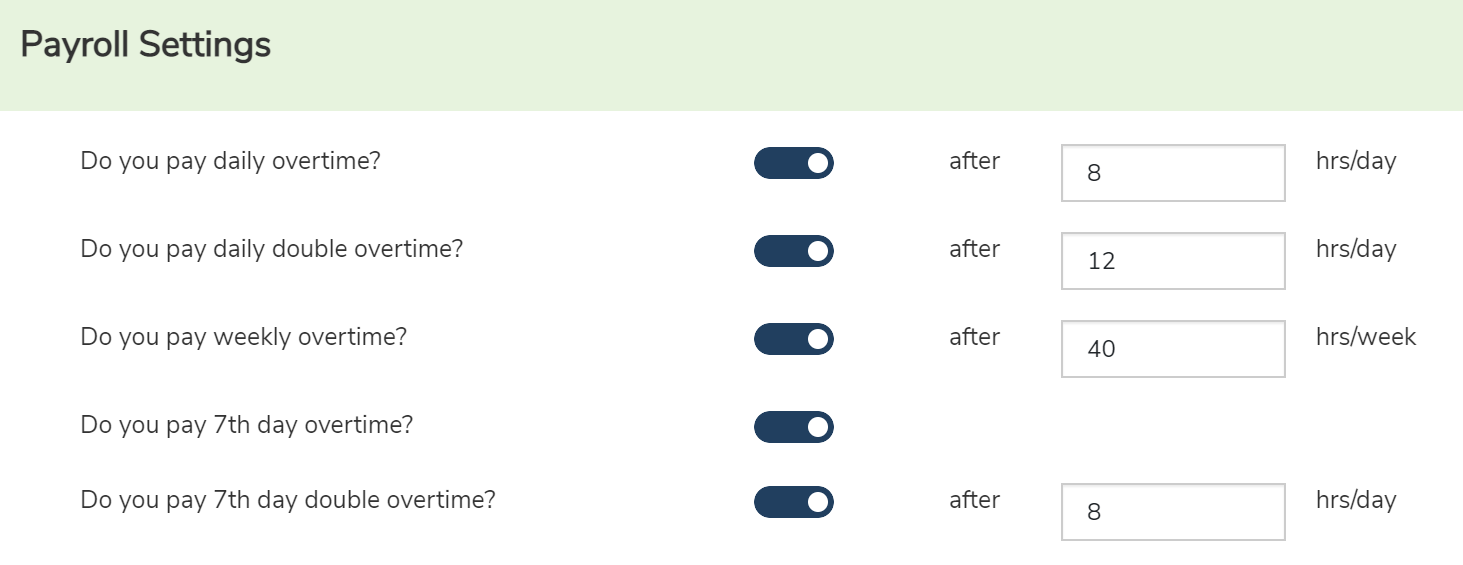
Payroll Settings can be accessed via the settings menu under Company -> Payroll.
This page contains all the Company information and settings related to Payroll. In the first section, you can select which Payroll Items to enable/disable. If applicable, this is where you enter the number of hours it takes to associate that payroll item, i.e. Daily Overtime after 8 hrs/day.
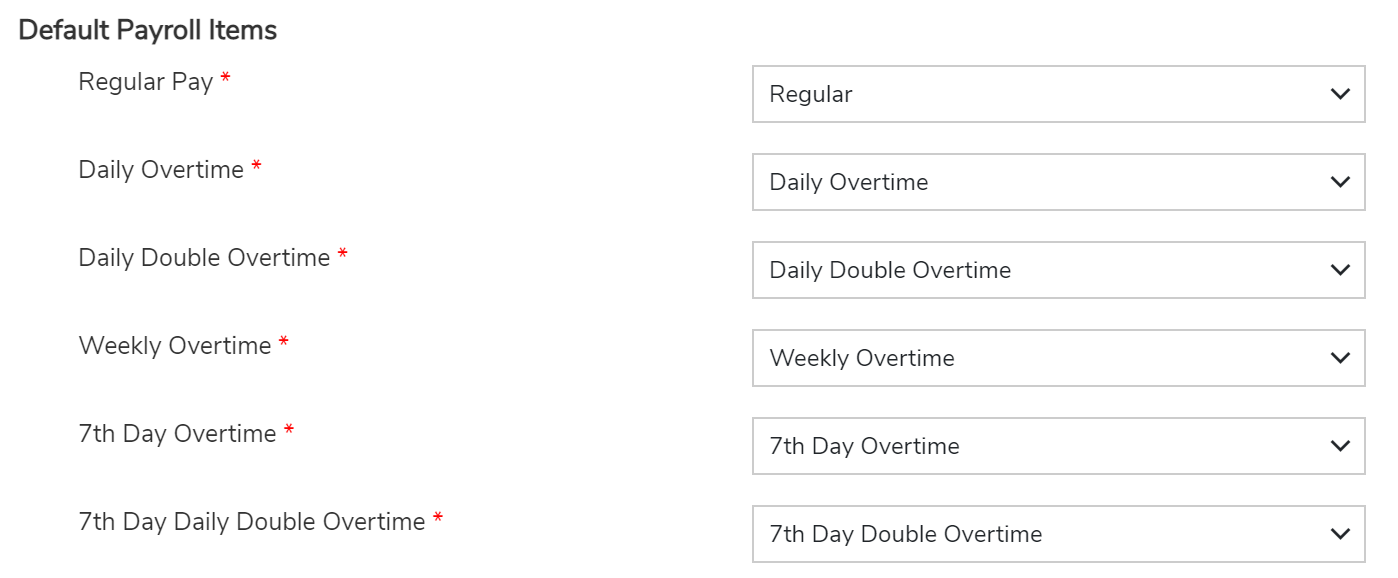
All of the selected Payroll Items will appear in the next section, Default Payroll Items. Here, you can select the type of pay to associate with each item.
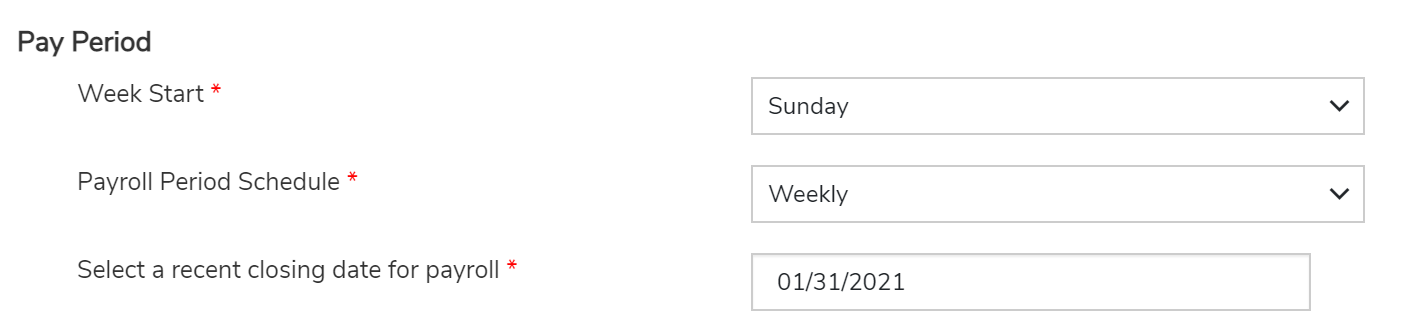
Finally, in the bottom section, you can set date information such as the starting day of the work week, the length of the payroll period, and a recent closing date for payroll.
Determining Payroll Items
To export Time Tracks to QuickBooks Desktop, each track must have an associated Payroll Item. Time Tracks can be assigned a Payroll Item using the Determine Payroll Item tool under Time->Exporting.
Arborgold will automatically determine the Payroll Items for employee Time Tracks based on the time tracked by the employee and your company payroll settings.

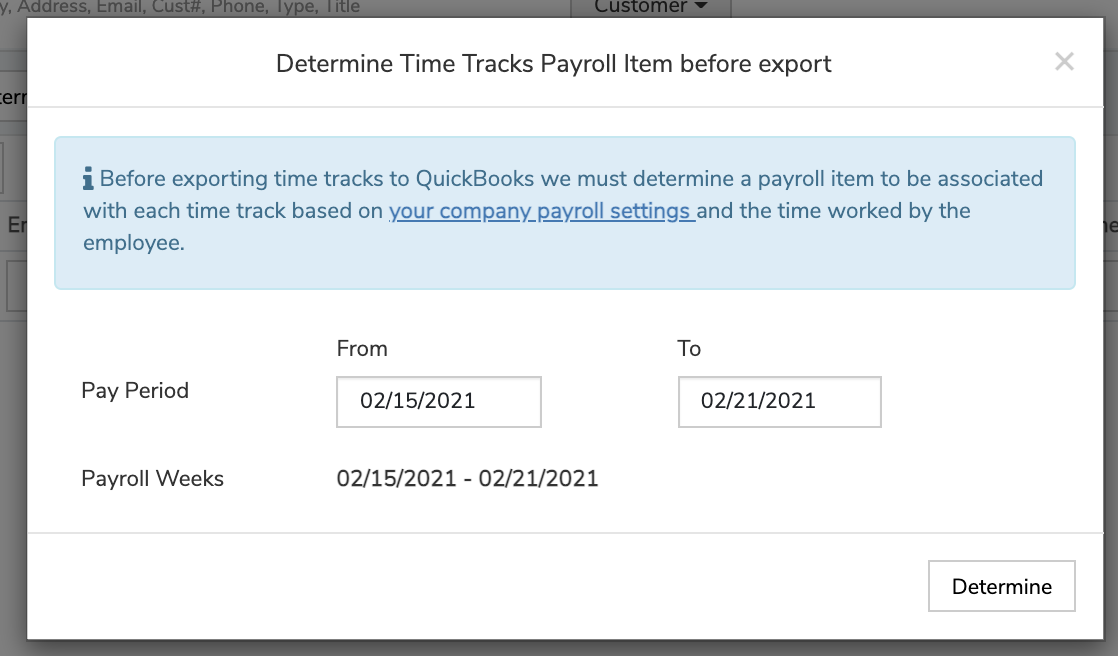
The Pay Period and Payroll Weeks will automatically be determined for you based on your company pay period settings.
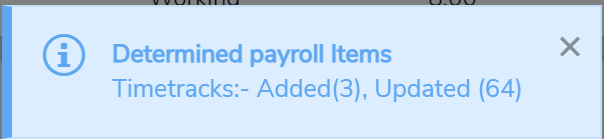
You can check all time tracks within a given Pay Period for any tracks that have undetermined Payroll Items. Click Determine, and Arborgold will automatically add or update the Payroll Item for every Time Track within the chosen Payroll Weeks.
The selected date range must be increments of 7 days to be considered valid payroll weeks.
In the above example, the first payroll week is Monday 1/4 to Sunday 1/10. 1/5 to 1/11 would also be valid. However, 1/4 to 1/7 would not be a valid payroll week.
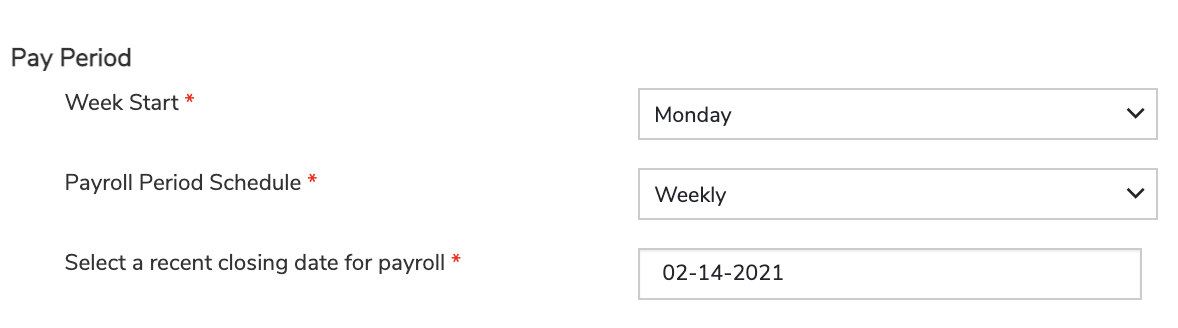
Each time you determine payroll, the recent closing date for payroll (in Company Pay Period Settings) will be automatically updated. In this example, after determining payroll the recent closing date would be updated to 02/21/2021
Exporting
You can access the QuickBooks Exporting page via Time -> Exporting.
The Exporting list will show all Time Tracks that
Are Completed, AND
Have not already been Exported to QB or Marked Exported, AND
Have an associated Payroll Item.
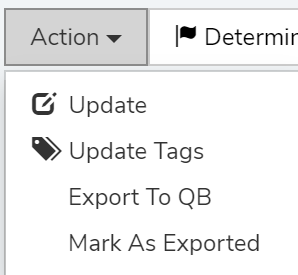
You can select one or more tracks from this list and Action -> Export to QB.

When exporting a track, the Customer Reference will be associated, and the notes will include the job name.
If you do not use QuickBooks and are manually exporting for Payroll, you can also select Mark Exported to update the Time Tracks.
Update Time Tracks from the Export Listing
You can edit/update time tracks from the Exporting screen as well. You can update a single track by double- or right-clicking it, or use Action -> Update and Action -> Update Tags to update tracks in batch.
Activity Logging
Time Track Activity Logging
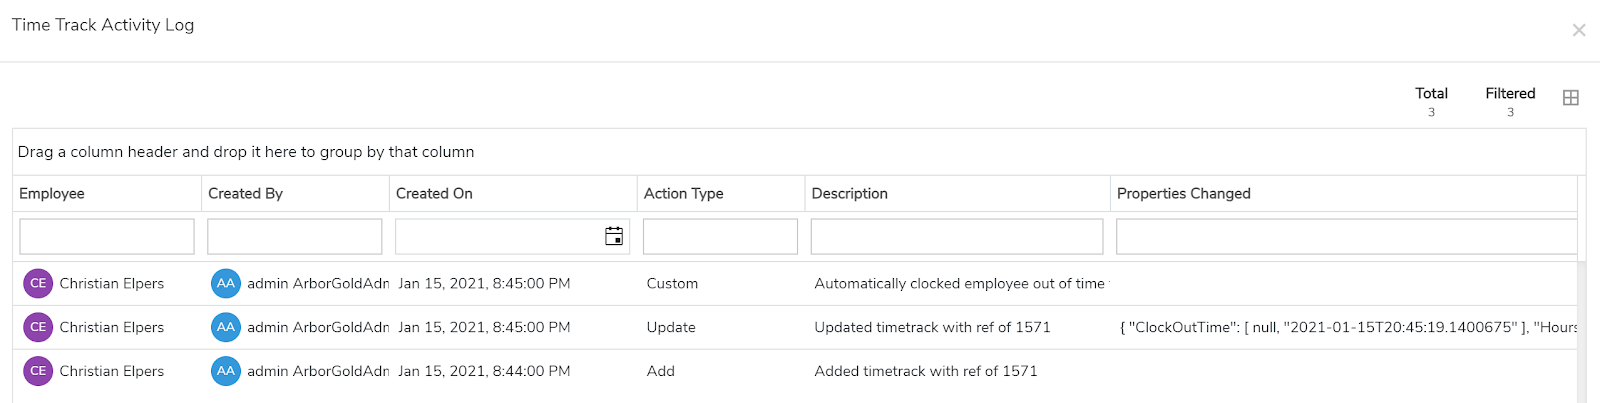
We’ve added extensive logging for all Time Track events and enabled you to view the logs captured under Time -> Activity Log.
The Activity Log page will show a listing of all Time Track activities. By default, it will display the most recent activity at the top.
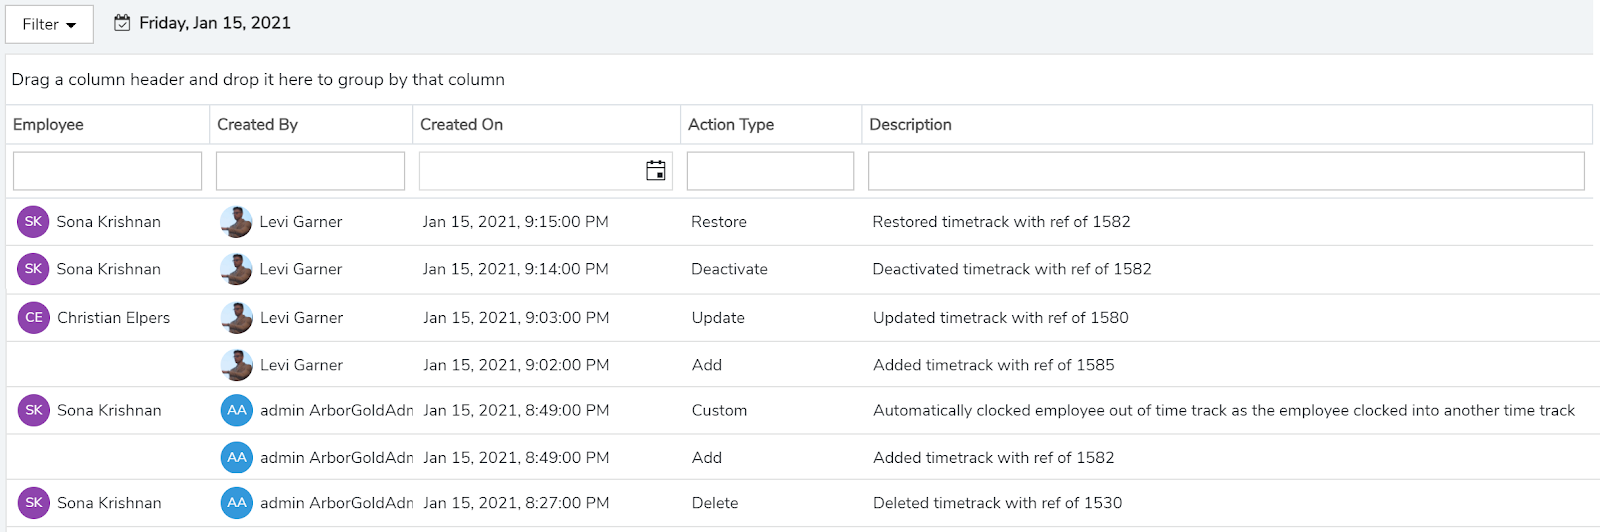
There are five unique events that we capture: Add, Update, Deactivate, Restore, and Custom.
Add is logged when a new time track entry is created.
Update is logged when any changes are made to an existing time track. We also track every change to the record under “Properties Changed”, showing exactly which information on the time track was updated.

Deactivate and Restore are logged whenever those actions are performed. (Delete is not logged)
Custom activity logs track things that our code does behind the scenes, such as the example where an existing time track was clocked out when the employee clocked into a different activity.
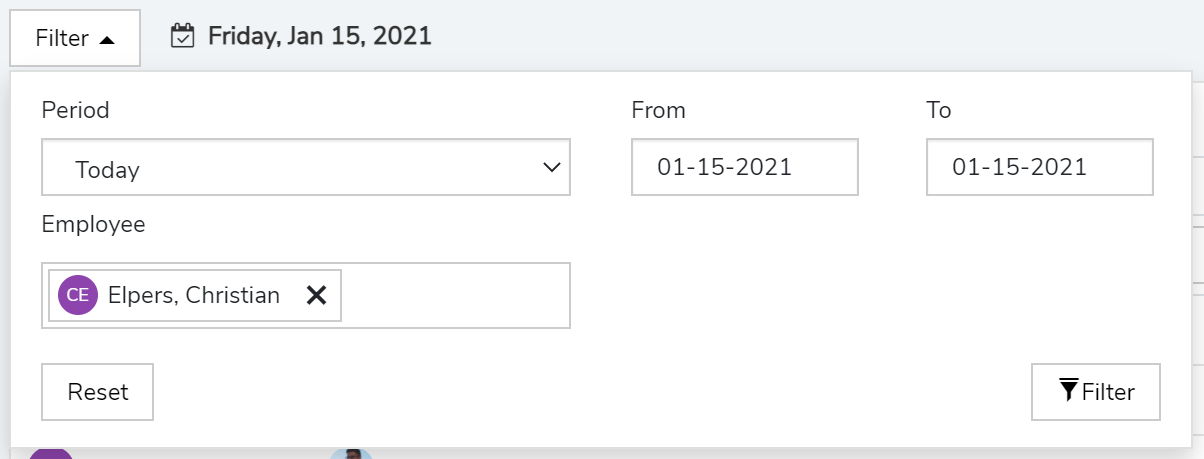
This listing can be filtered by date range and by one or more specific employees. You can also use column filters to view and organize the time track activity logs.
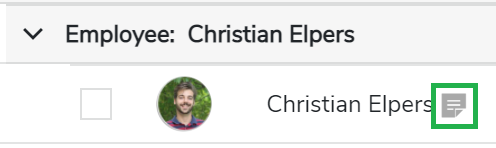
Each Time Track entry has its own log. Data for an individual time track can be viewed by clicking the Log icon next to the employee name on the Timesheet screen.
 Did this answer your question?