The value in the delivery feature enables your organization to track when and how much you’ve received from the vendor/supplier for a purchase order item. More importantly, it’s streamlined for your crew to be assigned to deliveries for job’s, so that they can confirm e.g. receive the delivery on the job site. Within the Confirming a Delivery section you’ll see how easy it is for your crews to see all the deliveries they’ve been assigned by job and then confirm the delivery. Again this streamlines a key supply chain process between office staff, crew’s and vendor’s.
Copy PO Item for Multiple Delivery Scenario
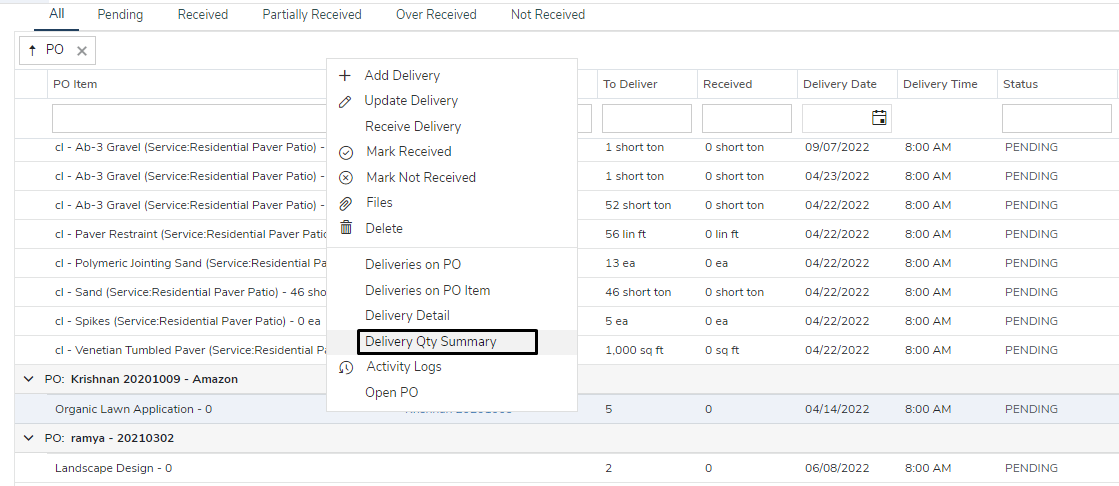
Using the Delivery Qty Summary
Adding Deliveries from Delivery Listing
Adding Deliveries from an existing Delivery
Delivery Right Click Context Menu
Marking a Delivery Not Received
Reverting a Delivery to Pending
Deliveries on Purchase Order View
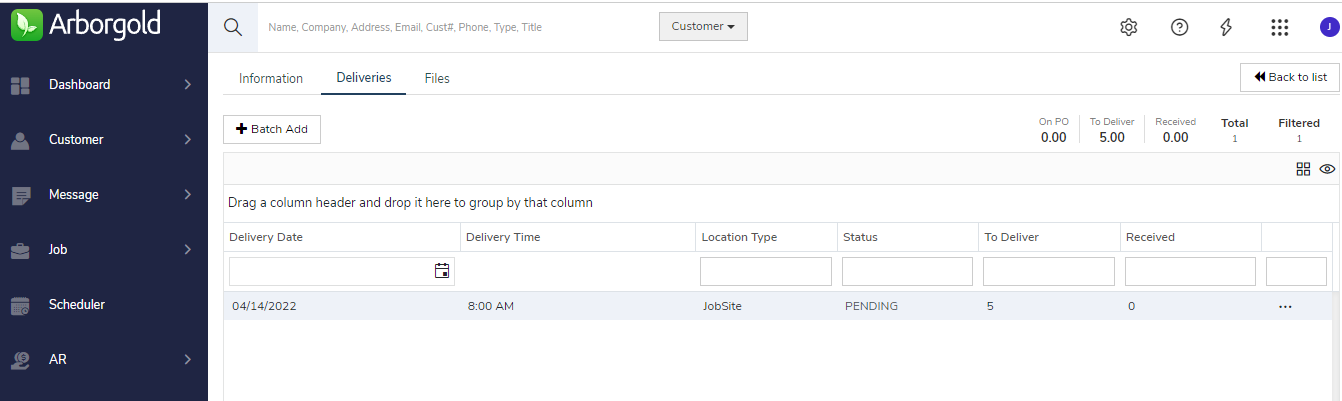
Deliveries on Job for Crews View
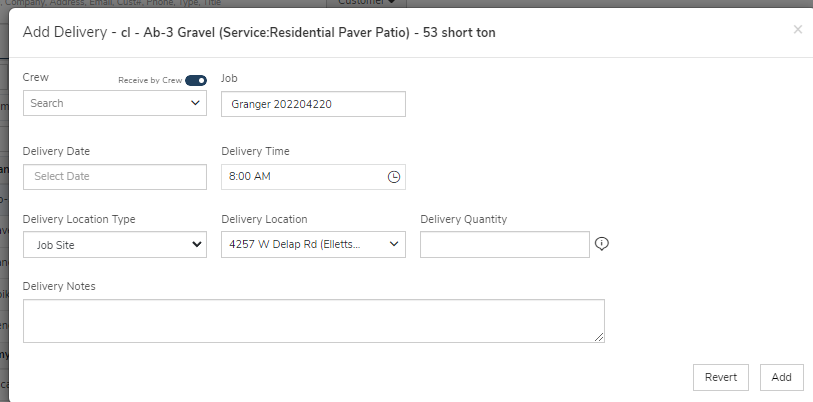
Adding a new Delivery
Purchase Order Item deliveries can be created for Job and Inventory Purchase Orders. We’ve done a lot to streamline and automate the process for adding deliveries per purchase order item. For example, when you add a new delivery to a purchase order of type job we will automatically do the following for you:
- The delivery will automatically be associated with the Job linked to the Purchase Order
- The delivery location Type will be set to the job
- Delivery Location will automatically be selected based on the Job Site associated with the Job linked to the Purchase Order
- We will get the crews you likely want to assign the delivery to. In the select list, you will see categories based on the crews scheduled, estimated, and not assigned to the job.
Note the Delivery Qty Summary can be used to help you determine the delivery qty.
Whenever you add a new delivery the status will automatically be set to Pending, whenever the delivery is Received the status will be set based on qty Received.


Batch Adding Deliveries
Via the Purchase Order Action menu, click the “Batch Add Deliveries” or you can navigate to the Deliveries tab and click on the “+ Batch Add” button.

This will populate the Batch Add Delivery screen which lists all the PO Items on the Purchase Order for you to create deliveries for.

Copy PO Item for Multiple Delivery Scenario
The AB-3 Gravel may be delivered on different days in different locations


Using the Delivery Qty Summary
You can use the Delivery Qty Summary option for a detailed overview of these key fields:
- PO Item Qty
- Total Delivery Qty
- PO Item Qty - Total Delivery Qty
- Total Received Qty
- PO Item Qty - Total Received Qty

Adding Deliveries from Delivery Listing
Delivery Listing lists down the Deliveries based on their different status and filters so you can easily create deliveries from the very screen.

Adding Deliveries via PO Item
Deliveries can be added from Purchase Order Listing as well as from the Purchase Order Detail screen.


Adding Deliveries from an existing Delivery
New Deliveries can be added to the existing deliveries. It can be added from the Delivery Listing screen or the Delivery tab for the Purchase Order detail screen.
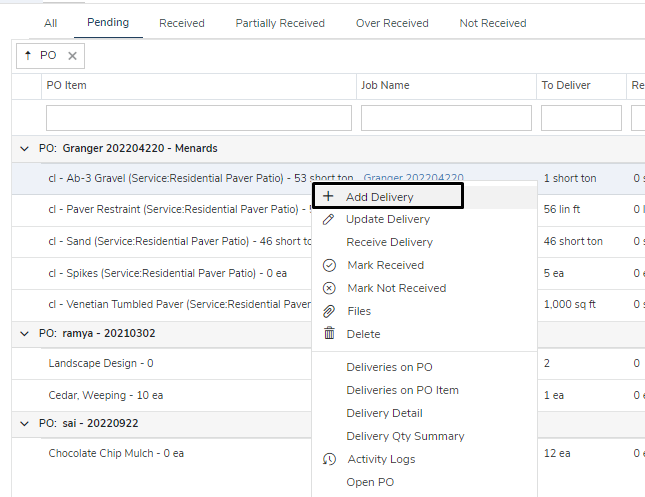

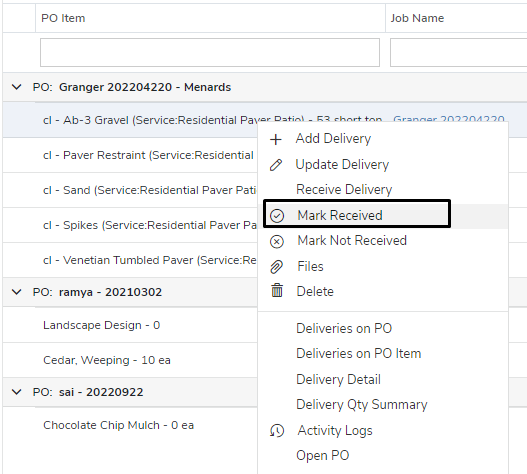
Delivery Right Click Context Menu
The right Click Context Menu offers more advanced actions that can be taken on the existing deliveries. The variety of options includes Adding new delivery, Updating the existing delivery, receiving the delivery, and many more.

Delivery Statuses
The Delivery status will automatically be set based on the quantity delivered vs received. The Delivery status will be one of the following:
- Pending
- When the purchase order is added and anytime it’s updated before the delivery is received.
- Received
- When the quantity received is equal to the delivery quantity
- Partially Received
- When the quantity received is less than the delivery quantity, but greater than 0
- Over Received
- When the quantity received is greater than the delivery quantity
- Not Received
- When the quantity received is 0
Receiving the Delivery
Confirming the delivery is likely an activity that the crew will be responsible for, however, you can also perform the action from the Cloud, if it’s a delivery that is getting delivered to one of your office locations.
On the Mobile Crew per Job, we will list out all of the deliveries assigned to the crew for the job.
This will:
- Determine the Delivery Status as mentioned within the Delivery Status section above
- Set the Confirmed Date and By


Marking a Delivery Received
Users can mark the Delivery as Received. This will:
- Set the Delivery Status to Received
- Set the Received Date and By
- Set the Received Qty to the Delivery Qty
Marking a Delivery Not Received
Marking the Delivery as Not Received is a command that can be applied to any existing deliveries from the list. This will:
- Set the Received Qty to 0

Reverting a Delivery to Pending
Users can also Revert a Delivery status back to Pending when applied the necessary changes to the selected delivery item. This will:
- Set the Delivery Status to Pending
- Set the Delivery Qty to Zero
- Remove the Received Date and By

Delivery Files
On Cloud
Arborgold Cloud now offers the File Upload feature for deliveries. Users can upload the necessary attachments/files to specific deliveries and can refer to them in the future which helps to keep track of the delivery’s historical data.

Deleting a Delivery
Deleting a delivery is an easy action that users can execute on the delivery listing or delivery tab screen. The option is available under Right Click Context Menu. This will:
- Physically delete the delivery
- All Logs will be preserved for the Delivery

Updating an Existing Delivery
When updating an existing delivery if the delivery qty changes for a non-pending delivery we will automatically update the status for you. Imagine the following scenario: the person creating the delivery entered 1 instead of 10, then the crew confirms the delivery and the vendor tells them the delivery was supposed to be 10. The office staff then updates the delivery qty from1 to 10, meaning the delivery status needs to be updated from "Over Received" to "Received."

Delivery by Status Listing
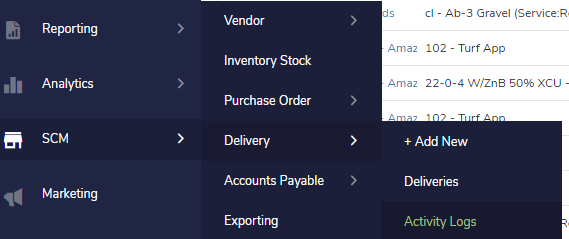
Navigating to SCM - > Delivery -> Deliveries tab you will see a listing of all the deliveries by Status. By default, we filter the deliveries with a delivery date within the current week.


Deliveries on Purchase Order View
Deliveries on Purchase Order View allow users to view the deliveries from a different angle. The window lists all the deliveries that are attached to the same PO with more columns.


Deliveries on PO Item View
Deliveries on PO Item View allow users to view all the deliveries associated with that specific Purchase Order item.

Deliveries on Job View
Deliveries associated with Jobs can also be viewed and accessed from the Job detail screen. Users can navigate to the Operations tab >> Deliveries tab from the Job information screen.

Deliveries on Job for Crews View
The Deliveries tab under the Job information screen can represent the data by Crews or any other columns available on the listing screen using Group By Column feature which bundles the deliveries by Crew or any column that is used as a grouping.

Delivery Activity Logs
All delivery activity is tracked and accessible for you under the dedicated Activity Logs screen. You can access and quickly see activity by:
- Period filtered criteria (SCM - > Delivery -> Activity)
- Purchase
- PO Item Delivery

Activity Listing and Filter
The Activity Listing screen offers different filtering options that users can apply as filters and view the desired items only as a list. The filtering options are as follows Period (date filters), Crews, and Purchase Order. The filtered list can then be exported as an excel file too.


Activity Logs by PO
The Activity Logs on the Activity Listing screen can be Grouped by PO Column. Users would want to enable the Column Grouping option using Grid Menu and have PO Column checked.


Activity Logs by PO Item
PO Item can also be used to Group the Activity Logs on the Activity Listing screen using the Column Grouping option under Grid Menu.
